Week 10

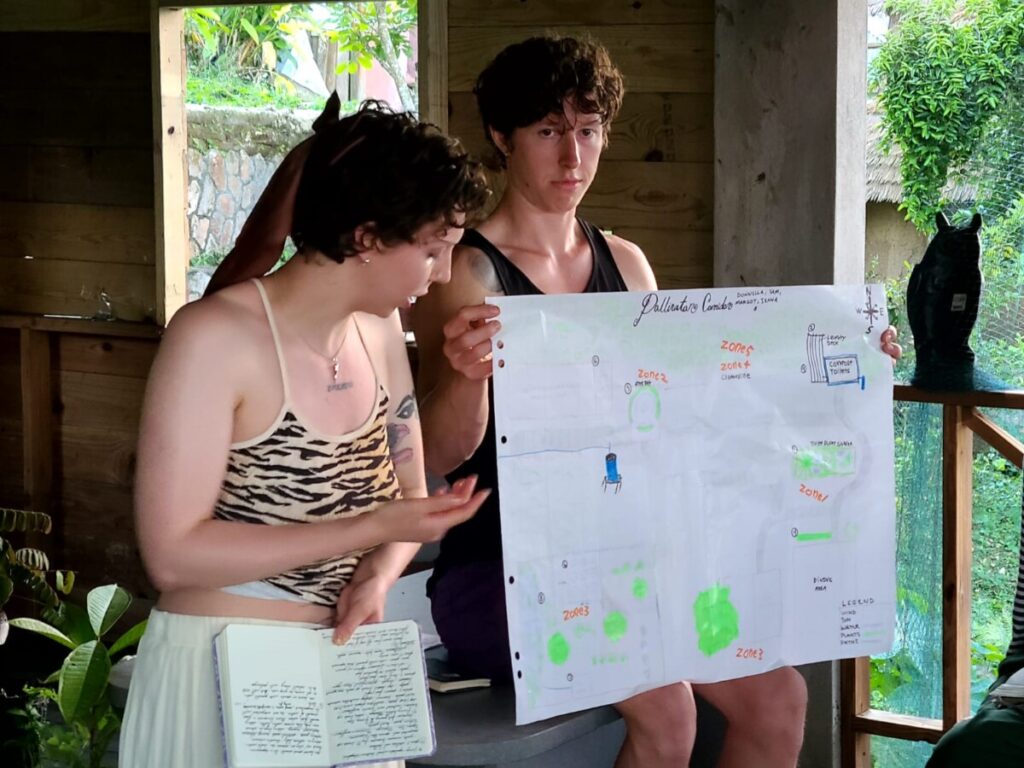
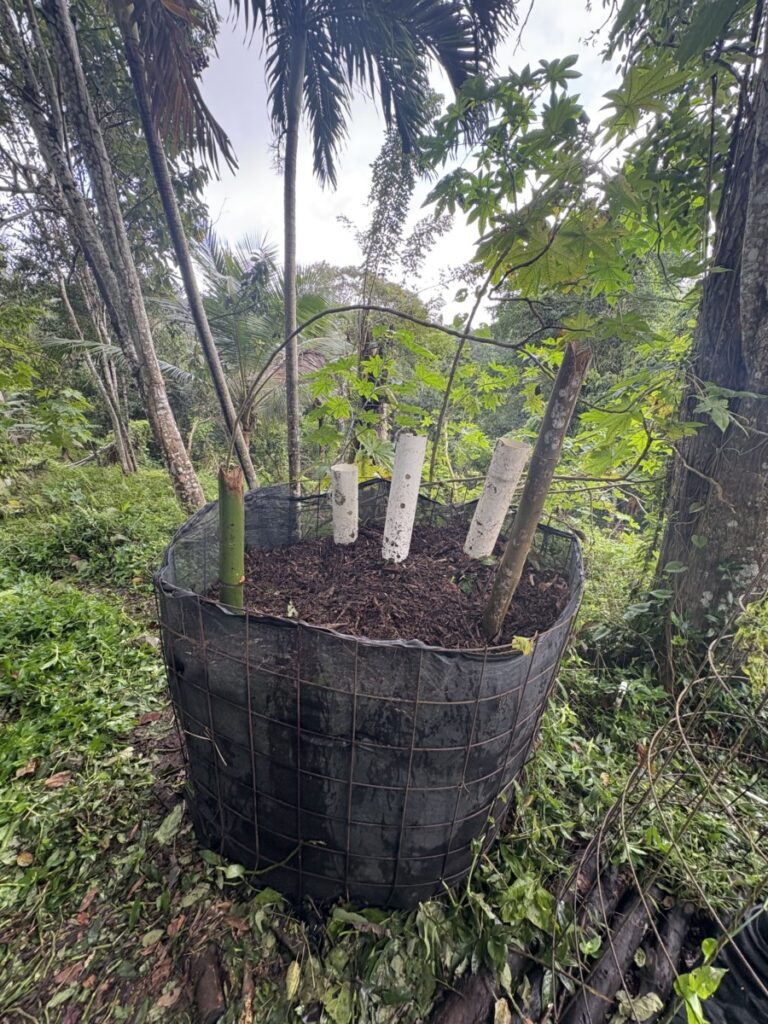
Our last week we were set to design some addition to a specific landscape area at Durga’s Den. I chose to look at an old fenced area where Lise used to keep her goats. My goals for that landscape were as follows:

Regenerating an Old Goat Pasture into a Thriving Bee Guild and Food Forest

Old Goat Area

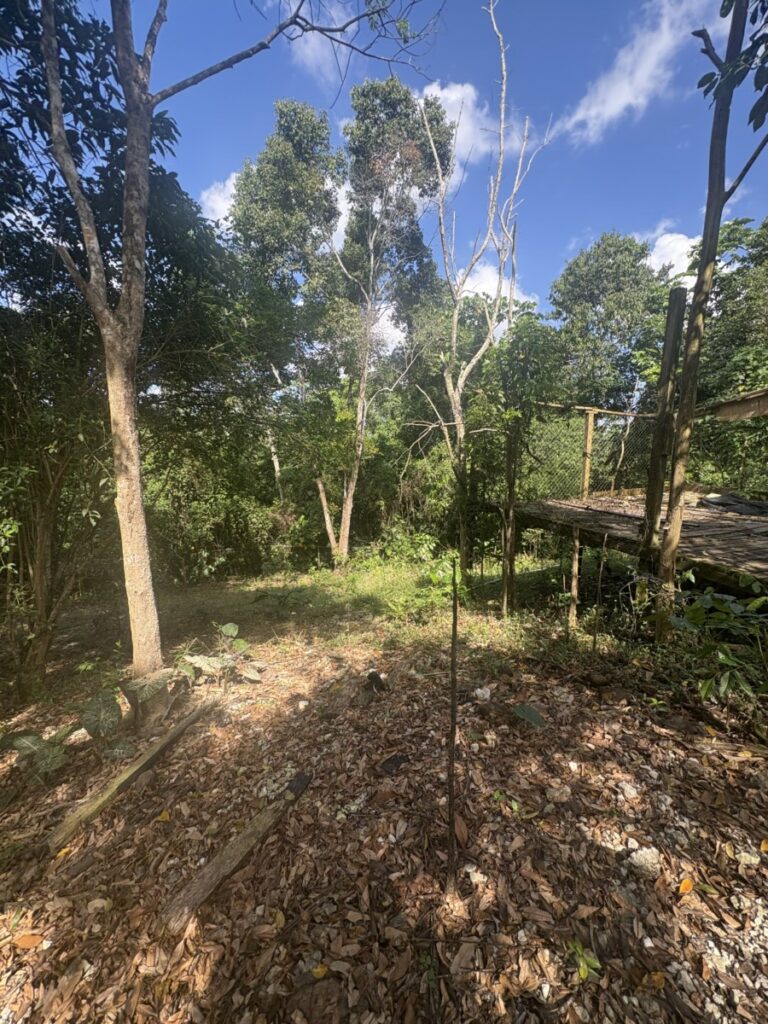
In revitalizing a goat pasture, I recognized the challenges posed by the rocky terrain, depleted soil, and limited vegetative growth. Establishing a bee guild in such an environment required a phased approach, focusing first on soil regeneration before creating a sustainable habitat for both bees and long term food production. This plan outlines a multi year strategy to build soil health, introduce pioneer species, and transition into a fully productive food forest that supports pollinators while improving the land’s fertility.

Phase 1: Regenerative Soil Building with Fast Growing Biomass Plants

The first step in transforming this limestone-rich landscape is increasing organic matter, fixing nitrogen, and breaking up compacted soil. This phase prioritizes fast-growing nitrogen-fixing trees, biomass plants, and ground covers to rapidly build soil fertility and prepare the land for food production. Key nitrogen fixing and biomass-producing trees include Leucaena, which grows quickly and adds organic matter, Pigeon Pea, which fixes nitrogen and produces edible pods, and Moringa, whose deep roots help break up limestone while offering nutrient rich leaves. To further improve soil structure, plants like Mexican Sunflower (Tithonia diversifolia), which produces nutrient-rich mulch, and Vetiver Grass, which stabilizes slopes and adds organic matter, should be established. These will be regularly cut and spread over the soil.For ground cover and additional nitrogen fixation, Cowpea improves soil health, Velvet Bean suppresses weeds and fixes nitrogen, and Sweet Potato prevents erosion while adding biomass. This diverse combination will help kickstart soil regeneration, creating a fertile base for the next phase.

Phase 2: Introducing Pioneer Food Crops

As the soil improves, hardy, deep-rooted food crops can be introduced to further break up limestone and enhance soil aeration. Cassava, which thrives in poor soils, and Yam (Dioscorea spp.), which grows well in rocky conditions, will help loosen compacted areas. Banana and Plantain will retain moisture and contribute additional biomass through their fallen leaves. In shadier areas, crops such as Chayote Vine and Passionfruit Vine can be planted to climb nitrogen fixing trees, while Taro and Ginger will thrive in moist, shaded areas. These plants will expand the ecosystem’s diversity and contribute to the overall resilience of the food forest.

Phase 3: Transitioning to a Long-Term Food Forest

By this stage, the soil will be significantly improved, allowing for a gradual transition from pioneer species to long term food producing trees. Some nitrogen fixing trees, like Leucaena, it can be selectively cut down, leaving their roots in place to decompose and further enrich the soil. These will be replaced with fruit trees, such as Guava and June Plum, which will now be well adapted to the improved conditions. To maintain soil fertility, the ground should remain covered with continuous nitrogen fixing plants like Wild Peanut or Perennial Cowpea, as well as deep rooted Comfrey, which accumulates nutrients and provides constant mulch. Once the food forest is established, the system should be actively managed to ensure long term fertility and resilience.

In addition for this guild there would need to be a source of water for the bees which I designed a wetland catchment system. The wetland system should be integrated at the lowest part of the slope. A French drain or soak pit can be constructed to slow release stored water, preventing runoff and increasing moisture availability. At the lowest point of the wetland, a small water holding depression can be created using clay, stones, or an old tarp to retain moisture for extended periods. To attract pollinators and maintain hydration for bees, floating plants and safe landing spots (such as logs, stones, and aquatic plants) should be incorporated.

Presenting Ideas To Our Class

Week 9

For this project, I really wanted to look into be keeping done in Jamaica due to them having a 12 month growing season which gives optimal conditions for honeybee production. Beekeeping in Jamaica has experienced significant growth, emerging as one of the fastest growing subsectors in agriculture over the past decade. The number of hives has increased by more than 50% from 2008 to 2018, driven by rising demand for hive products in both local and export markets. This expansion has led to over a 90% increase in the price of bee products, reflecting their growing economic value (Ministry of Agriculture, Fisheries & Mining).

Honey Bee on a Bidens alba

Unfortunately, I wasn’t able to see any hives in action, however I was able to speak and meet the owners of Irie lyfe. Irie Lyfe, is a family owned business based in Airy Castle, St. Thomas Parish. Founded by Nzinga and Zubari, Irie Lyfe specializes in creating unique, natural, value added bee products. Their offerings include ginger-infused honey, scotch bonnet pepper-infused honey, herbal teas, and body products, all crafted using sustainable practices. Their dedication to leveraging local resources and traditional knowledge not only supports their family but also contributes to the local economy and promotes environmental stewardship. This approach reflects the rich cultural heritage and entrepreneurial spirit of Jamaica, positioning Irie Lyfe as a testament to the potential of small-scale agriculture and sustainable business practices. In their apiary management, Irie Lyfe employs natural materials such as shredded coconut (coconut kaya) and dried banana leaves as smoker fuel during hive inspections. Additionally, to protect hives from pests like ants, they place the hive stands’ legs in containers filled with grease, serving as a deterrent.

Stopping at Irie Lyfe For that Good Honey
Information on Jamaican Beekeeping

Week 8

Our second week in Jamaica was very special to me as we got to expierence a large portion of what our class was primarily focused on chocolate and cocoa. While this seemed to be sort of a side quest away from our studies of permaculture it really added a deeper layer into the areas of plants I am interested in studying for this project. We headed out to Saint Andrew on February twenty-fifth to Mount Pleasant Chocolate where we were introduced to Averelle and Helen who are the owners and operators of Mount Pleasant Chocolates. It was the first time in my life seeing a cocoa tree. The one in particular I spent a long time looking at this one tree in particular grown in a separate plot that had a contained chop and drop style of compost done upon it. The tree was so delicate to be in contrast to how large and heavy the cocoa pods are.

Cocoa Tree

After taking a walk through their farm and even getting to plant our own coca tree we began to partake in the process of the fermentation of cocoa. Cocoa fermentation using a wooden box lined with banana leaves is a traditional and effective method for enhancing the flavor and quality of cocoa beans before drying and processing. After harvesting, the cocoa pods are split open, and the wet beans, still covered in their sweet, sticky pulp, are placed in the fermentation box. The banana leaves help retain heat and moisture, creating an ideal environment for microbial activity while also imparting subtle aromatic compounds to the beans. This natural insulation prevents excessive drying and helps maintain the necessary temperature for proper fermentation.  The fermentation process occurs in two main stages. In the first stage, which lasts for about two days, natural yeasts convert the sugars in the pulp into alcohol, generating heat and promoting microbial activity in an anaerobic (low-oxygen) environment. As fermentation progresses, the process shifts to an aerobic (oxygen-rich) stage, where bacteria convert the alcohol into acetic acid over the next three to five days. This acid penetrates the beans, breaking down their internal structure and allowing the development of the complex chocolate flavors that are essential for high-quality cocoa. Throughout fermentation, the beans are typically stirred or turned every two days to ensure even exposure to oxygen and uniform fermentation.  The internal temperature of the box can reach 45–50°C (113–122°F), which is crucial for killing the bean’s germination capacity and breaking down undesirable compounds. The entire process usually takes five to seven days, depending on the cocoa variety and environmental conditions. Once fermentation is complete, the beans are removed, rinsed if necessary, and then sun-dried before further processing. Proper fermentation is essential for reducing bitterness and astringency while enhancing the rich, chocolatey flavors. The flavor profiles of Jamaican chocolate are described as nutty and fruity.

I go crazy for cocoa

Week 7

Upon arriving in Jamaica I did not expect how the trip was going to go pertaining to my ILC, but just as my mentality had been with the earlier part of the quarter I decided to roll with whatever came my way. On my first day in Jamaica I was introduced to our host at Durga’s den Lise. Lise was the perfect person to interact with on the basis of my project surrounding soil science and jamaica’s soils. Lise had done a lot of work around various soil composition especially macro and micro organisms in the soil food web. Lise started us off on our second day with a tour of her various composting systems including , vermacompost , Johnson-Su , and hybrid methods.

Vermicompost is a nutrient rich organic fertilizer produced through vermicomposting, a process in which earthworms break down organic matter into biologically active, microbe rich compost. In her method Lise used , Eisenia fetida (red wigglers) to consume decomposing plant material and excrete worm castings, which improve soil fertility. Vermicomposting does not rely on high heat but instead fosters a cooler, microbially diverse environment that enhances soil health. Additionally, the liquid runoff, known as worm tea, can be used as a natural fertilizer.  

Worm on Worm on Worm

The process of vermicomposting involves placing organic materials such as vegetable scraps, shredded paper, coffee grounds, and decomposed leaves into a worm bin or pit with proper moisture and aeration. Over time, the worms break down the material, producing nutrient-dense castings that enrich the soil. This method is particularly suited for small-scale or indoor composting, as it requires less space than traditional composting and does not produce strong odors. However, maintaining a successful vermicomposting system requires providing the worms with optimal conditions, including adequate moisture, temperature, and ventilation. Certain materials, such as oily foods, citrus, and meat, should be avoided as they can harm the worms or create imbalances in the bin. Although vermicomposting takes longer than thermophilic composting to process large amounts of material, it yields a highly concentrated and beneficial soil amendment. I remember holding her compost in my hands and how rich it smell. The colors so dark from the humeric acid and the good energy she had put into it. Lise also showed us her bubbler system for making compost tea from the vermacompost. She said she does a 1:10 ratio of distilled water to compost and lets it bubble for 24 hours.

Her three main systems of large-scale compost are done through thermaphyllic , johnson-su, and a hybrid method. Thermophilic composting is a high-temperature process that rapidly breaks down organic materials while eliminating weed seeds, pathogens, and harmful microbes. The temperatures ranges needed for this compost are 50–70°C (122–158°F). This can be achieved through a mix of carbon-rich (browns) and nitrogen-rich (greens) materials. To sustain aerobic conditions, the compost pile requires frequent turning or forced aeration. While it is an efficient way to generate compost quickly, the high temperatures can sometimes reduce microbial diversity and lead to nutrient loss. In contrast, the Johnson-Su bioreactor method is a slow, no-turn composting system designed to create fungal-dominant, biologically rich compost. Developed by Dr. David Johnson and his amazing wife Hui-Chun Su, this method involves a static pile with vertical aeration pipes that ensure oxygen flow while maintaining moisture at around 70%. The composting process takes approximately 12 months, allowing beneficial microbes, particularly mycorrhizal fungi, to thrive. Rather than being used as bulk soil amendment, the resulting compost serves as a microbial inoculant to enhance soil biology and plant health. Her third method of a hybrid is a mix of these two styles of composting. This method we participated in generating by following the methods of the browns and greens from the thermophilic method while additionally adding in the vertical aeration pipes from the Johnson-su method.

Johnson-Su Method Done By Lise
The Hybrid Method We Developed

Week 6:

This week, several articles and books have deeply inspired and expanded my research.  

One that stood out was Social Forestry: Tending the Land as People of Place by Tomi Hazel Vaarde. This book provides a rich perspective on forestry, integrating the ethics of earth care, people care, and fair share principles that align closely with those of permaculture. Vaarde’s words resonated with me on a profound level, offering insights that feel like a natural extension of the core ideas shaping my work. A few of Hazel’s quotes struck me as particularly powerful, ones that I feel could complement the main quote on my overview page:  

“Human cultures are built on narratives. The power of story can glamor us when the story fits the place, the people feel the power of the land and are reconfirmed in their story.” (415)  

And another, equally stirring:  

“Principle 51. It is not virtuous to exploit nature just because your ancestors were removed, placeless, and disenfranchised.”  

I stumbled upon an article titled Radicchio, Not Roses and my jaw physically dropped. The article proposed a bold and beautiful idea: replacing traditional Valentine’s Day roses with radicchio in floral arrangement styles. This simple yet revolutionary concept electrified me. It reframed the way we view what is “beautiful” and “worthy” in the natural world, challenging the conventions of floral aesthetics and consumer culture. It was as if the land itself was speaking radicchio, with its deep crimson hues and intricate veins, standing in defiant elegance, reclaiming space in a world accustomed to commodifying nature in predictable ways.  

https://natoora.com/en-US/stories/radicchio-not-roses-2024/

Reading this, I felt something shift within me: a deeper confirmation of the power of land, story, and belonging. This isn’t just research; it’s a living, breathing dialogue with the earth itself.

Last night, after sharing this article with a few friends, I heard an aggressive knock at my door. I got up and opened it, and to my surprise, there stood my very good friend holding two beautiful radicchio di Chioggia. This was just a step into the power that radicchio holds. As she handed me the radicchio, she said, “Radicchio, not roses, right?”

Makings of My Chocolate Bar

First,

I carefully peeled the leaves off of my radicchio and placed them in the dehydrator at 325 Degrees Fahrenheit, letting them crisp up for 3-4 hours. While they dried, I began melting chocolate using a double boiler method, stirring gently until it reached a smooth, velvety consistency. Once the chocolate was fully melted, I poured it into molds, carefully pressing the dehydrated radicchio on top for a unique contrast in texture. To finish, I drizzled honey over each bar, adding a touch of natural sweetness.

Not wanting to waste any chocolate, I grabbed the extra radicchio pieces, dipped them into the remaining melted chocolate, and gave them a final drizzle of honey.

Finally, I placed everything into the freezer, allowing the chocolate to set and the flavors to meld beautifully.

I carefully chose each ingredient with deep intention, ensuring they reflected different parts of myself and my journey. The radicchio came from a small organic farm in Northern Washington, its crisp bitterness grounding the recipe in nature and craftsmanship. The chocolate, sourced from Pump Street, carried the essence of Jamaica grown cocoa, adding both depth and richness. And the honey, harvested from the very farm where I once worked in my hometown brought a personal sweetness, a reminder of my roots.

Each element wasn’t just an ingredient but a piece of my story.

The Ingredients Used
After Pouring the Chocolate in the Molds
Before Freezing the Radicchio Chips