Amateur Hydro-Engineering for Fun and Profit (no profits were made)

I would like a weir.

Nicola Shirley-Phillips of The Source Farm via WhatsApp prior to our departure for Jamaica

During the chaotic lead up to our study abroad pivot from Trinidad to Jamaica, I had the good fortune to reach out and attempt to lay some groundwork before the travel was even approved. Through pure providence, I have an extended family connection to The Source Farm Ecovillage, specifically Nicola Shirley-Phillips, Colleen Williams, and Nomi and Dwight Shirley. Not about to let a perfect one-for-one replacement site slip by a number of WhatsApp conversations led to an eventual link up while on ground!

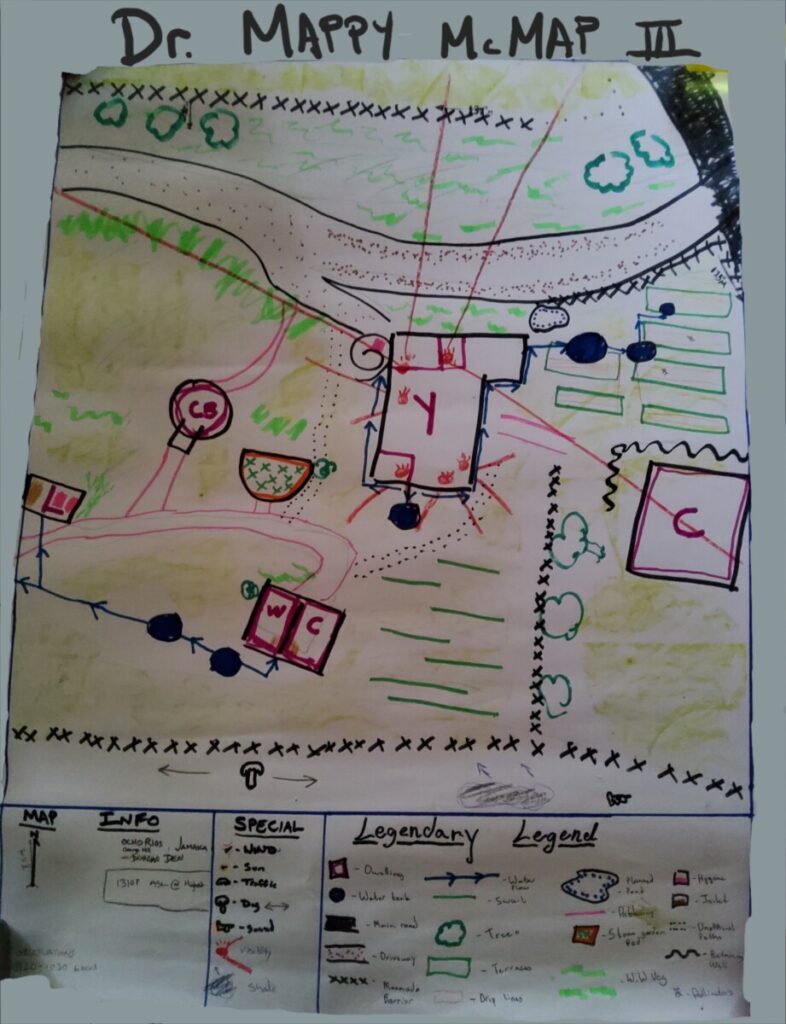
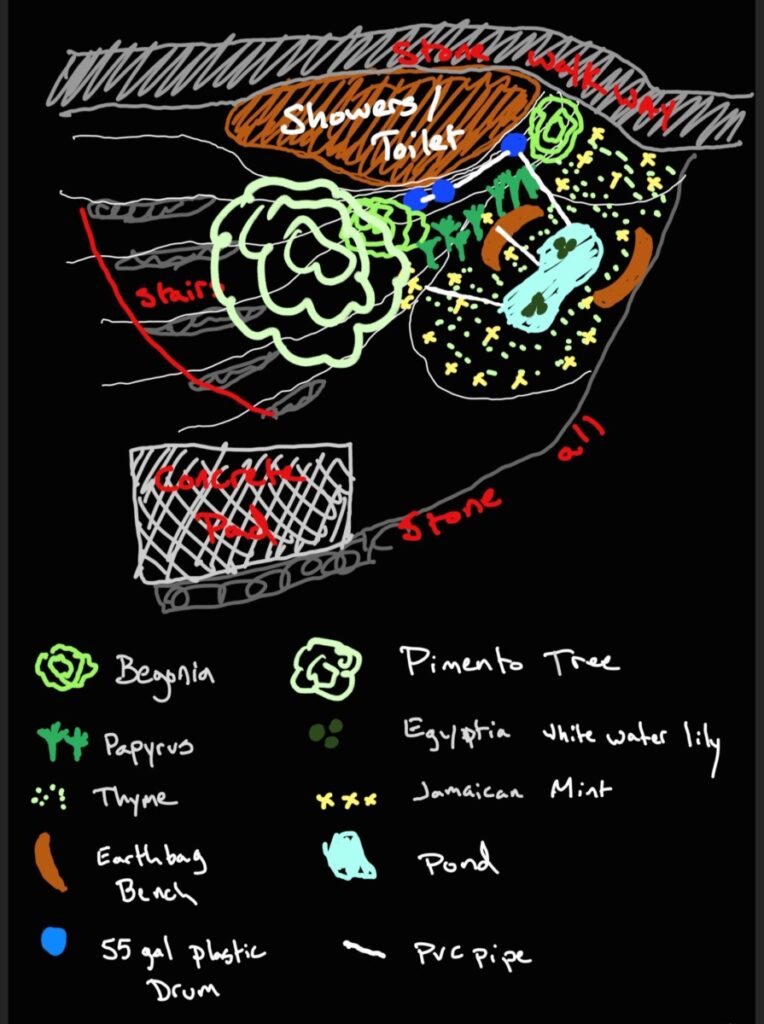
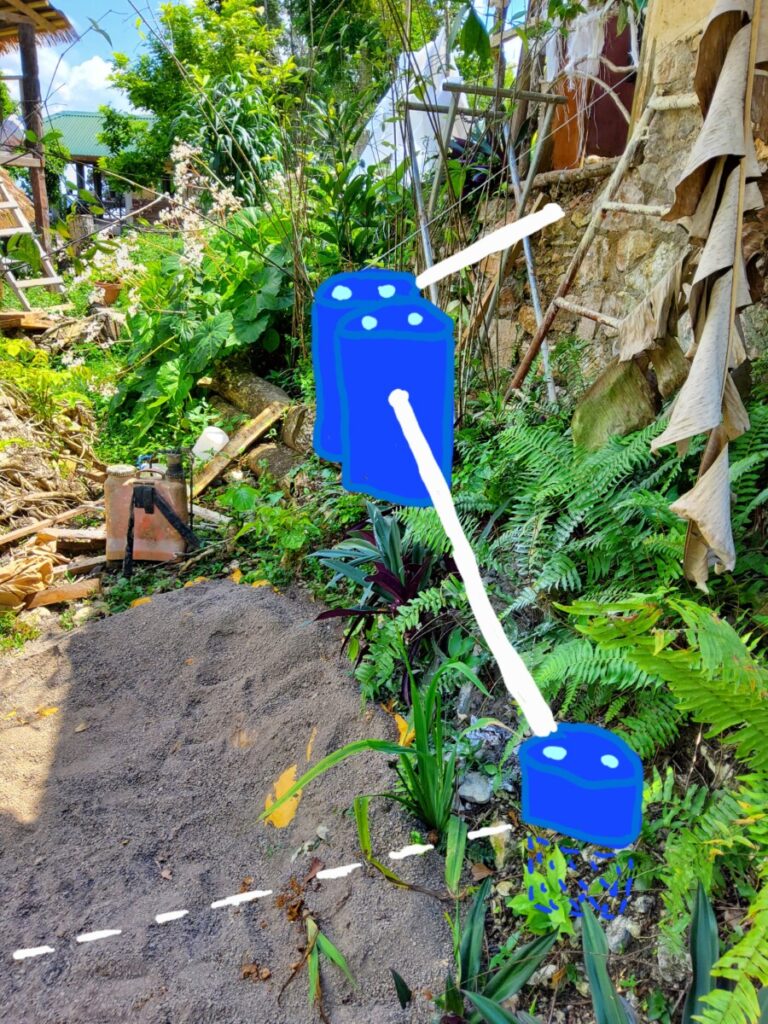
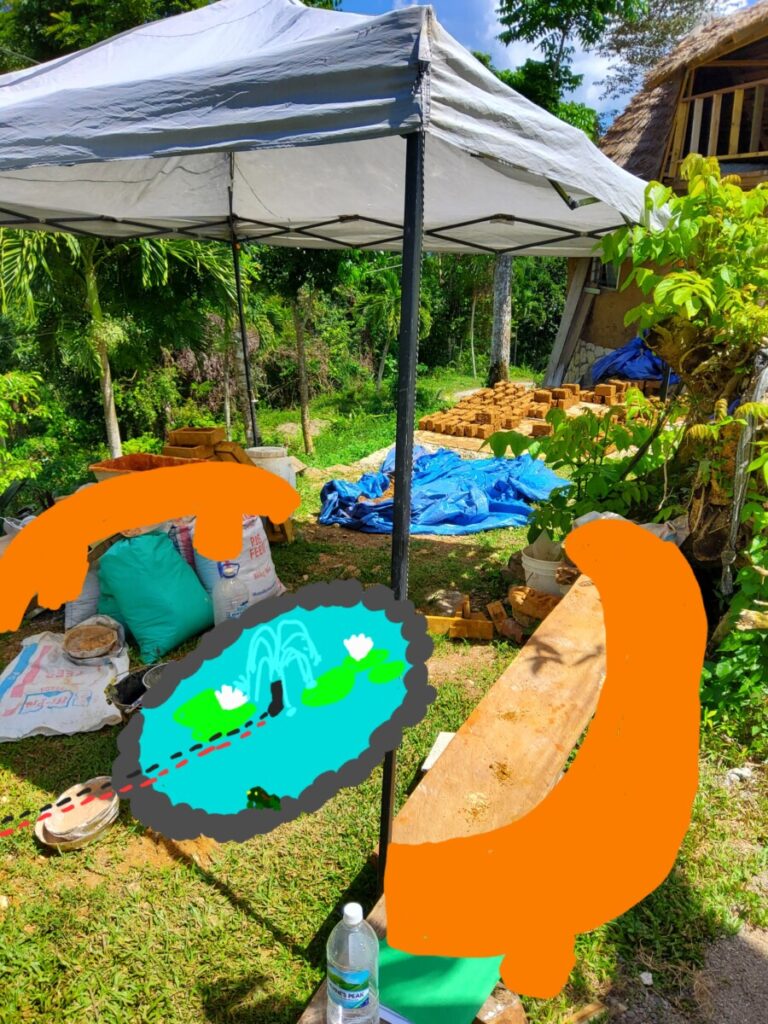
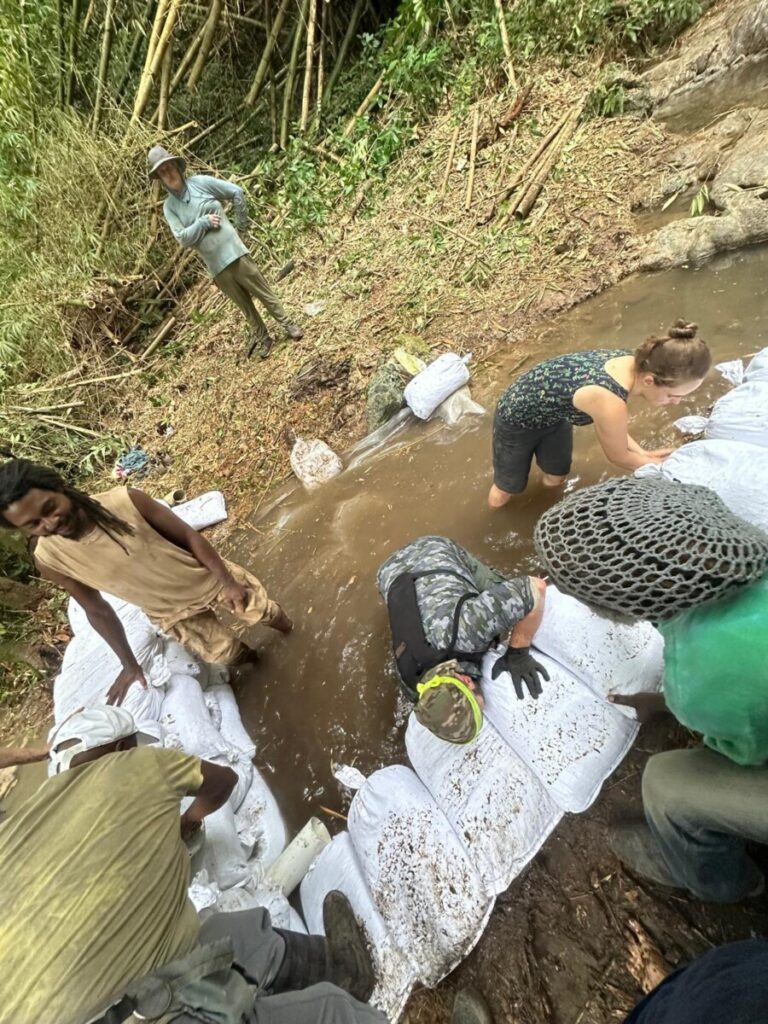
During the conversations, the lack of water access for the Guango Wild Garden Conservancy (GWG) was brought up. Without water, the processing center at the site was unusable, and by extension the Source’s activities with the Ujima Organic Market suffered. This seemed like the perfect place to apply some nondestructive learning in the form of labor support to the effort.

Conversations lead to the understanding that emplacing a weir. Awesome. Now wtf is a weir?! Put simply, a weir is a kind of restricted flow barrier placed in a channel. It holds water upstream in a weir pool, and allows a flow-through, or crest, that can manage the holding pool height, weight/pressure of water upstream, and down stream flow all from a single point. As cool as it sounds, there is a lot of variation to weir design and it can have major impacts on its effectiveness, longevity, and usefulness.

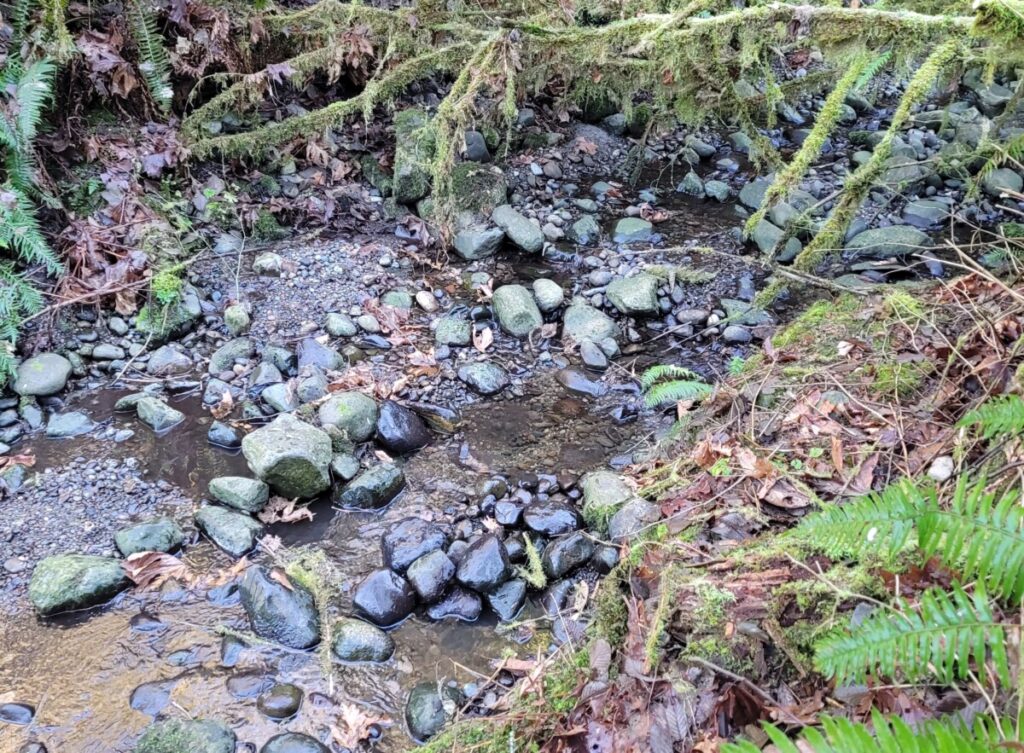
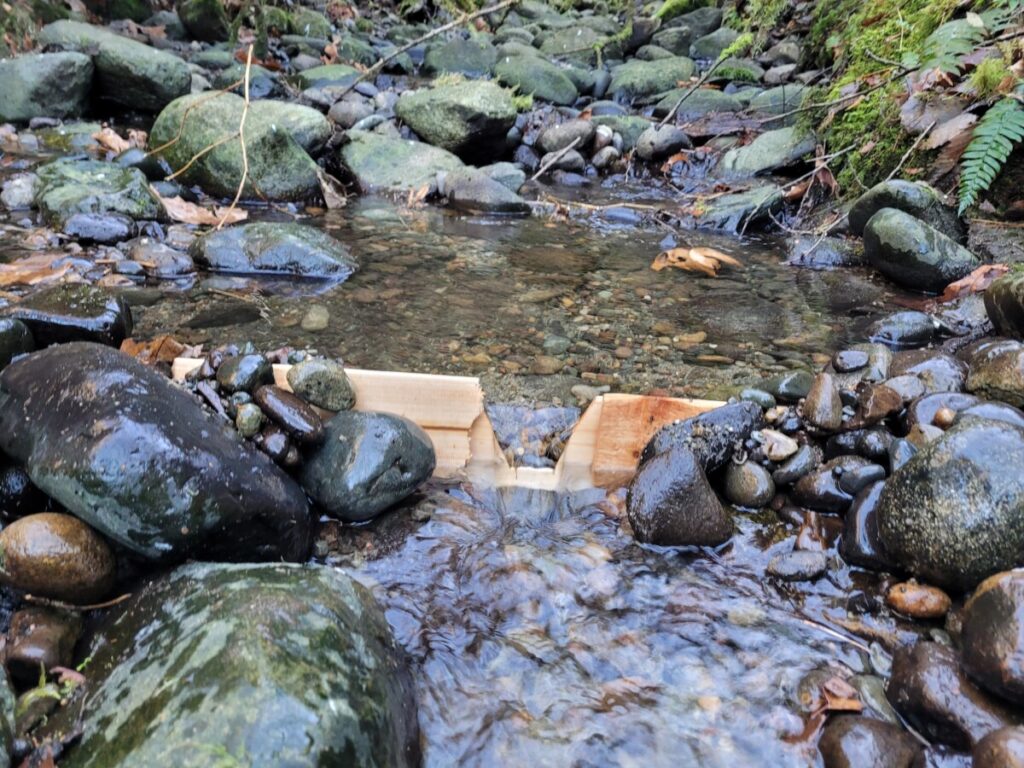
I’m a hands on learner, so armed with all of humanity’s collective knowledge, I grabbed some scrap aromatic cedar off-cuts, a handsaw, my dog, and some plucky determination before setting off for a backyard creek to test different weirs.

As good a spot to weir as any, right?
Test site cleaned and modified to test weir plates.

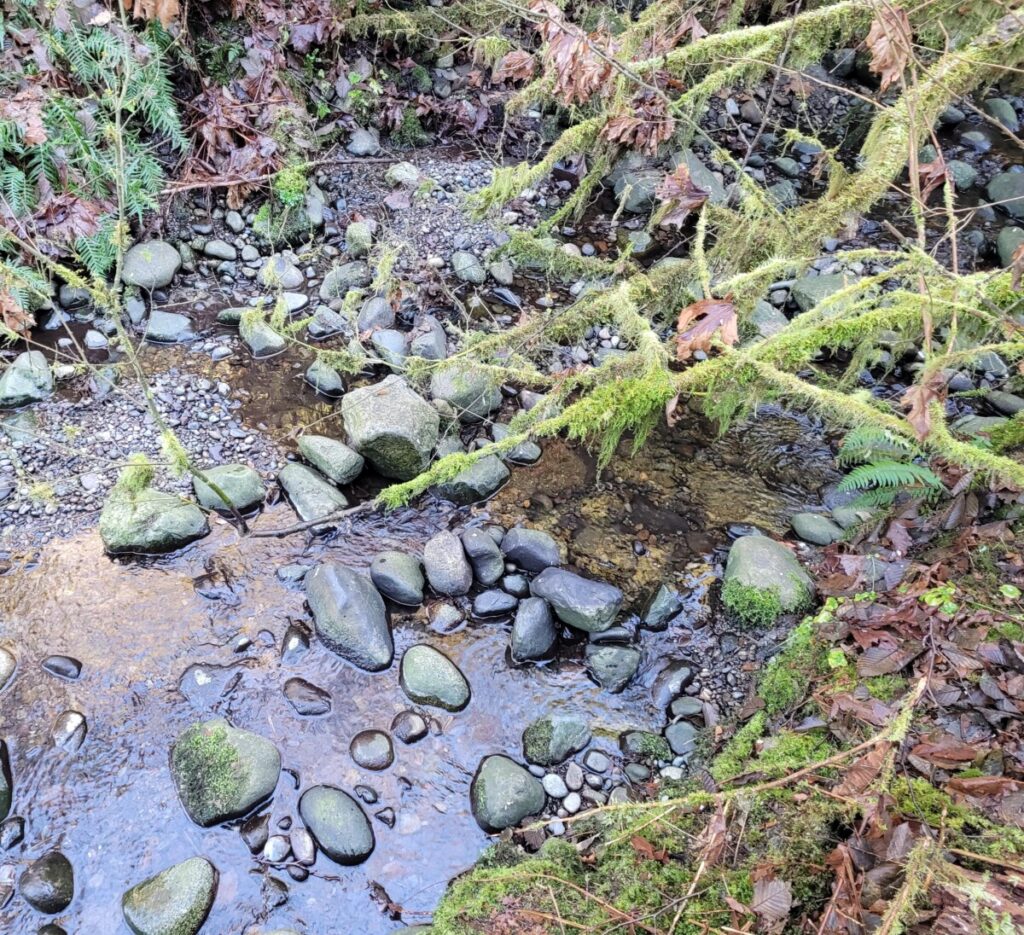
The opening of a weir is called an orifice. It determines the flow-through capabilities of the weir, as well as its water retention capacities in the weir pool. Trial an error was the name of the game. 20° V notch weir? Too small. 90° V notch weir? Too big. 4″ Rectangular Weir? Too basic. 4″ Rectangle-to-45° Compound weir? Too complicated. It seemed my stock of cedar was destined for a waterlogged graveyard of failure.

Compilation of failed designs. The dashed line shows the 60° trap weir orifice. Foreshadowing…

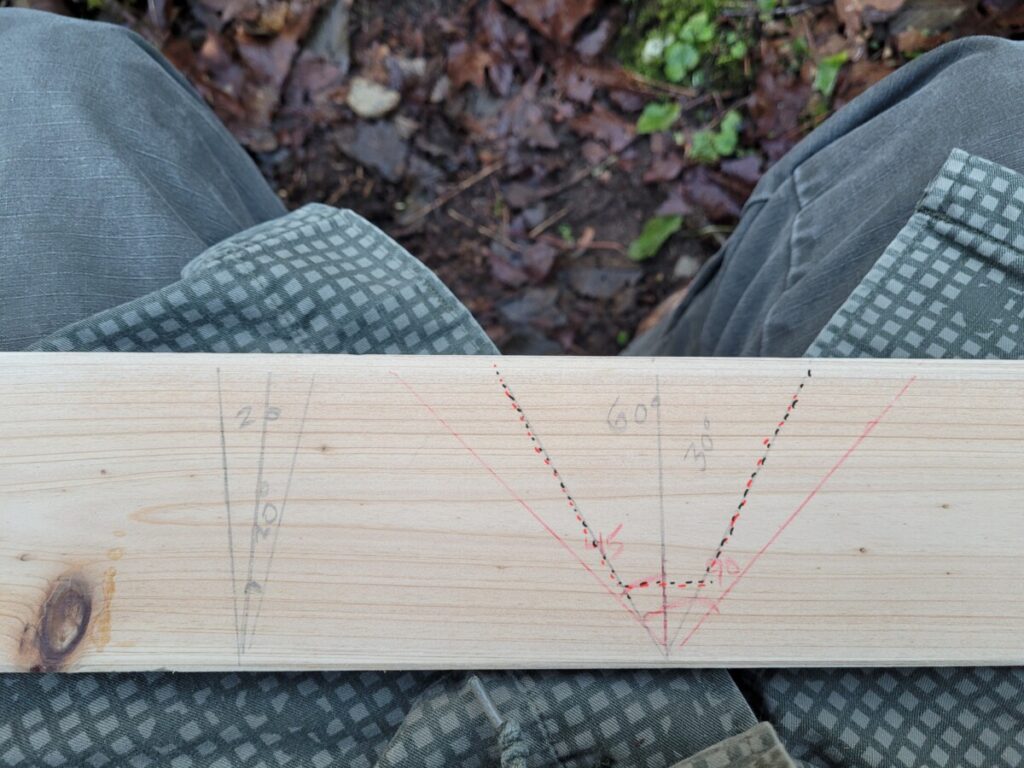
Before giving up and going back to being Curt in the Dirt with no water creds, I tried a trapezoidal weir. A V notch whose bottom is a simple flat edge. Perfection. The V allowed for increasing outflow as the water backed up, while the half-rectangular bottom allowed for consistency. Eureka!

Top-down view of the weir plate (and scraped failures). Not the weir pool height (bottom) compared to downstream flow (top). That’s a lot of water retention!
9 out of 10 engineers recommend Crest.

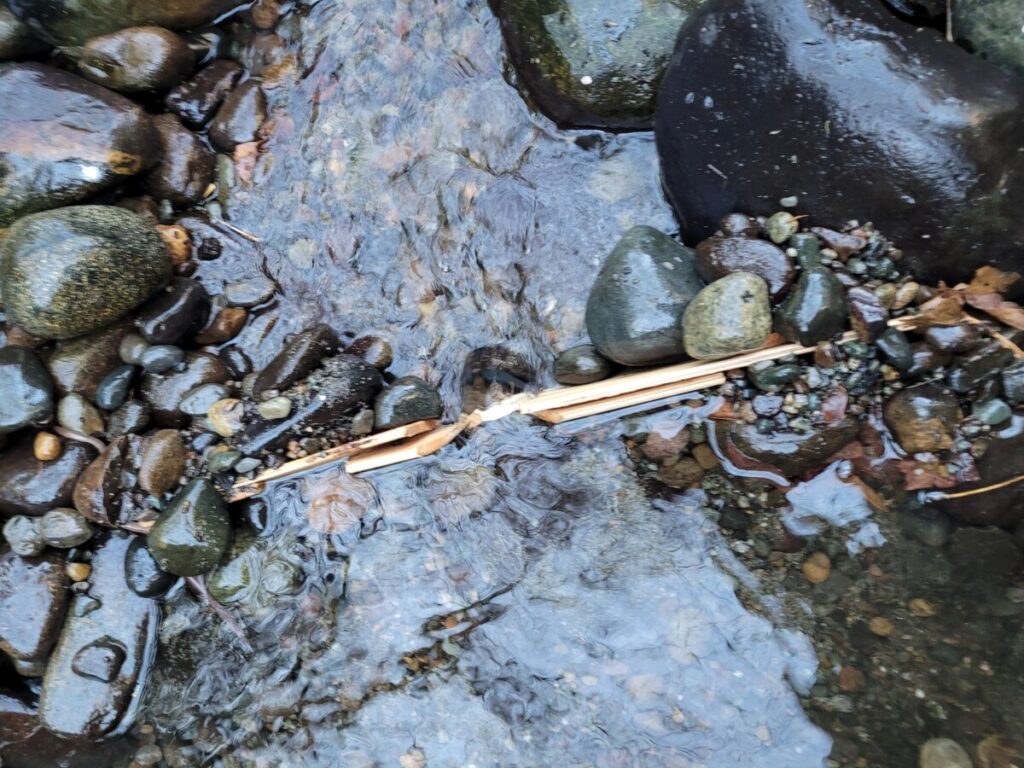
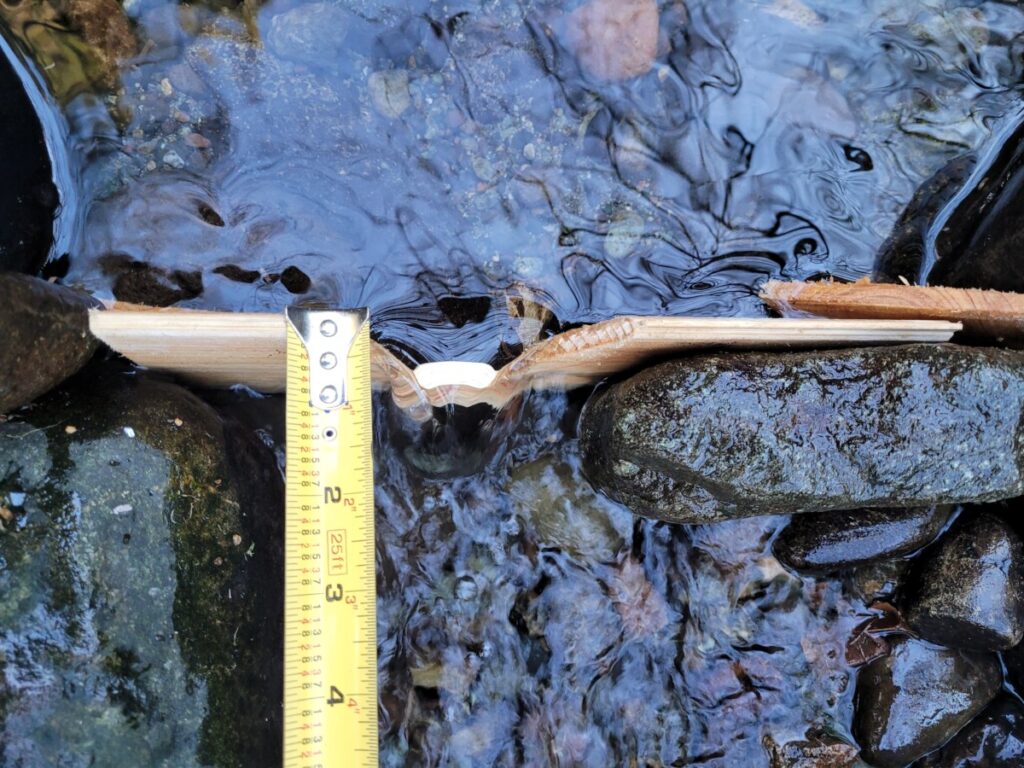
I left the weir in place for 15 minutes to track pool growth and retention. I observed my spillway (made of a piled stone “leaky” weir) offload the overflow of the weir pond. I measured the crest and reinforce the downstream flow with flat stones to prevent scouring (washing away/removal of the stream bed due to crest flow). All was working. The lessons learned in observing failure made the observations of success sweet indeed!

Centered in the channel, anti-scoure stones at the crest, clean flow-though, a calm/straight weir pool above, & a leaky weir serving as the overflow spillway (right side of image). That’s a damn fine weir.
A simple, but effective scale weir in all of it’s glory.

I may not be a Hydro-engineer, but I could play a passable one on TV.

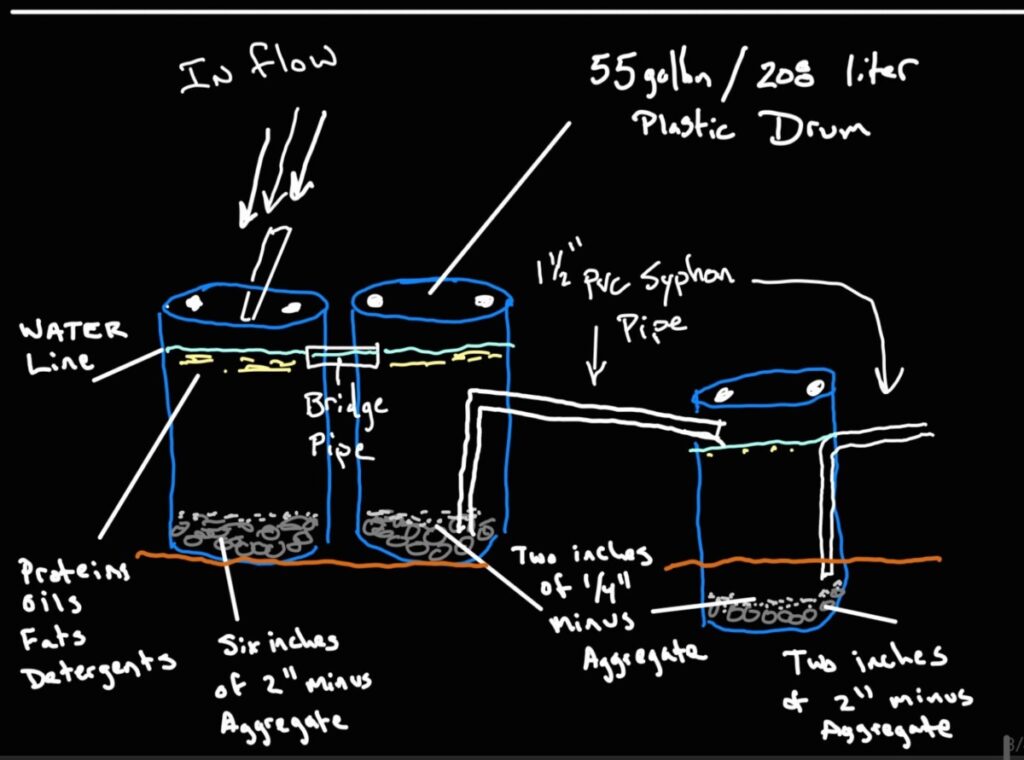
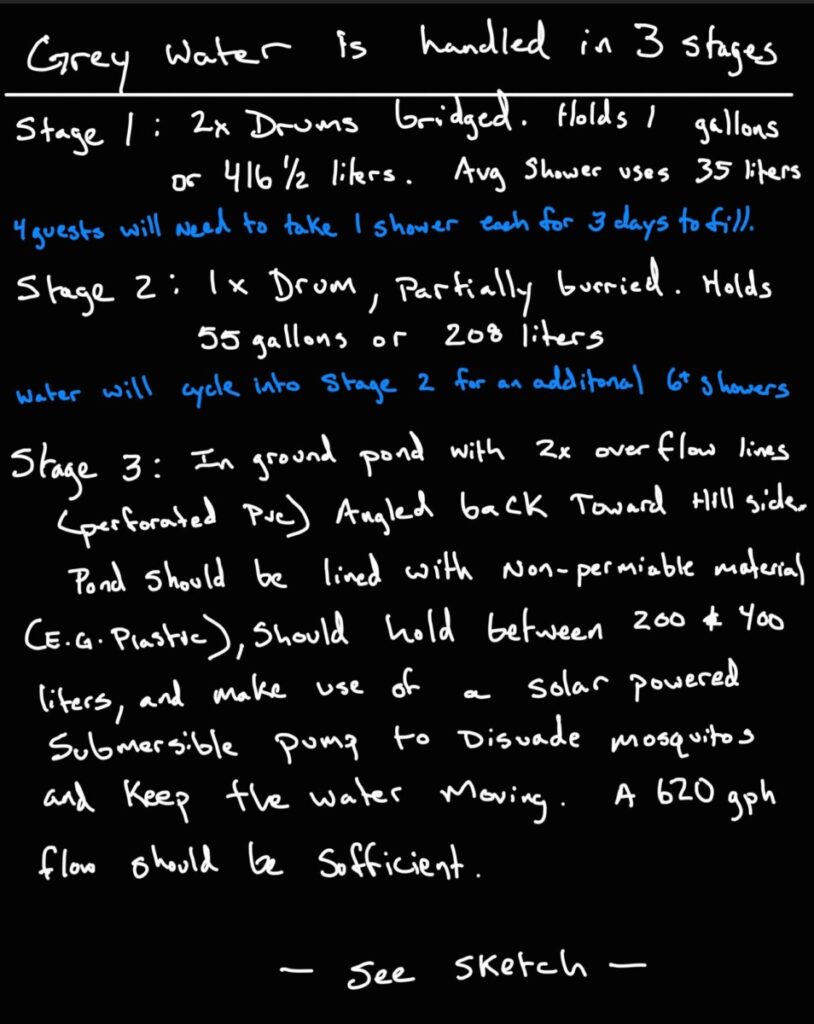
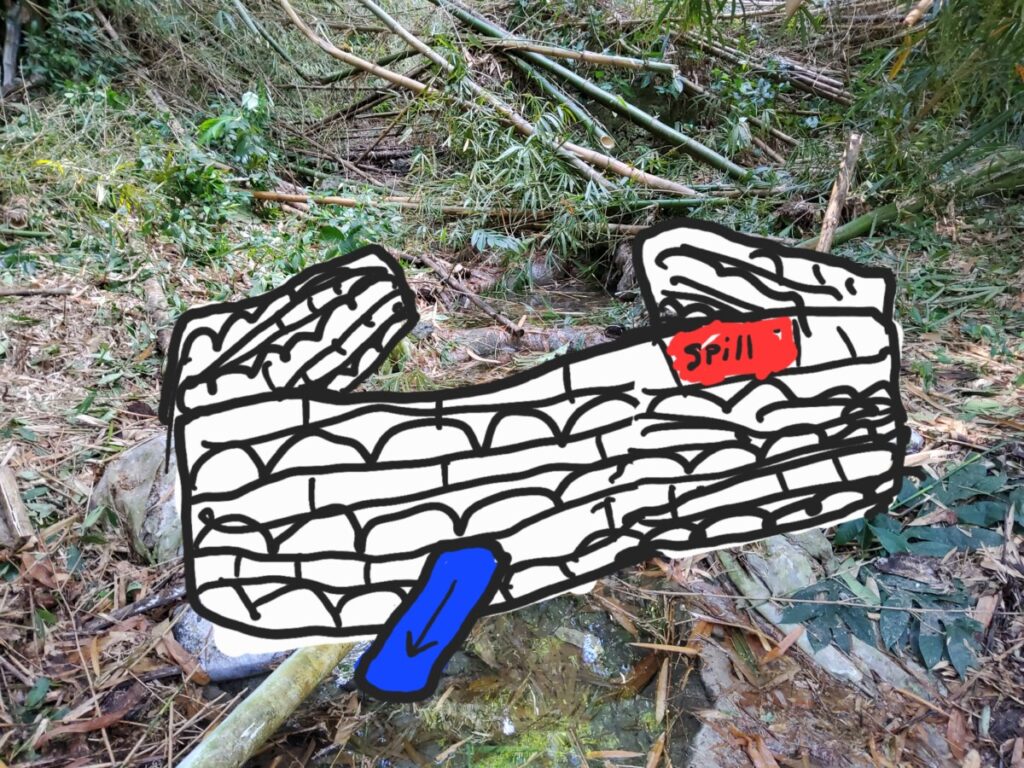
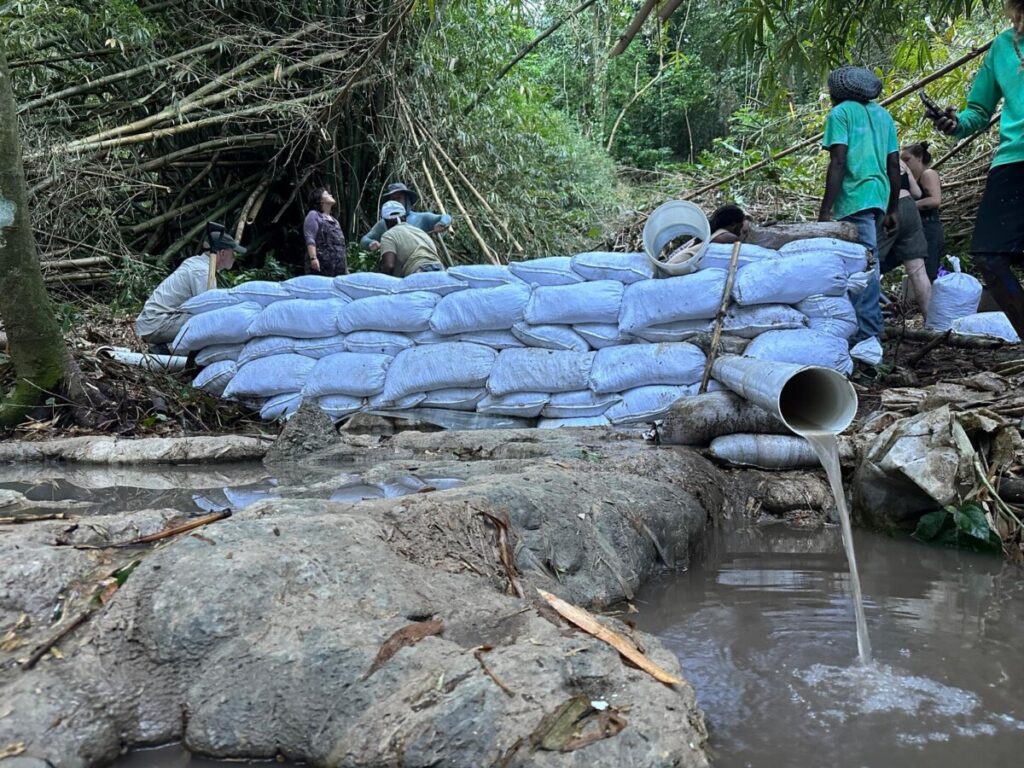
As the trip solidified and the timelines were laid out, the GWG water project would morph and grow. Ultimately a three-sided catchment would be designed and emplaced, and my 60° trapezoidal weir would never manifest. But all was not lost! A sediment/debris screen would be added to the back of the catchment box. It’s design? A leaky weir, baby! We got there in the end.

The team building up the hips of an in-creek catchment box.
An objectively talented artist’s concept sketch of the catchment project.
The project at about 80% completion nearing sunset of day two (of three).

I regret nothing. I learned a LOT in my research and testing. While it did not materialize in the planned project, there is nothing stopping it from being useful in my future. Basically I learned on my own time (yuck). I will leave you with this: a video of a handsome dog and his unqualified, self-taught owner talking about things of which he only has a basic grasp. Enjoy!

Applied Design Post for One Regeneration/Durga’s Den

It seems that water has been the theme of your PDC.

Rodjé Malcolm, giving me the run down on Durga’s Den’s hopes for a greywater system.
The team’s original base observations map.

The applied design project saw team Mappy McMap doing our best to utilize the potential of the elements and landforms that made up the front third of Durga’s Den. From the main road, up the driveway, until you are parallel with the upper showers/toilet, all the way up to the neighbor’s fence line. This portion contains the majority of the guest houses as well as the yoga deck, lower garden beds, and upper swales.

The site of the proposed greywater reclamation system.

I was given the responsibility of designing a greywater reclamation system for the section of the property. After some clarification, this project was requested by Lise and Mikey and is something they wish to work with going forward. As such, I was given the area pictured above to work with, and a mandate that the system be able to handle inputs from approximately four guest’s weekly.

Given the relatively tight area, and soil samples showing loamy clay sitting on top of limestone/marl, I decided a mostly contained system would serve the purpose better than open air succession ponds. I set to work brainstorming designs and settled on plastic 55 gallon drums as the vessel to catch and manage the greywater.

Concept sketch of stages one and two of the greywater system for Durga’s.
The process.

Ultimately, I wanted a system that would scale with increased inputs, manage overflow within the area that currently takes the used water, and would be relatively accessible for any necessary maintenance that may need to be performed. A scaled down version of the water separation systems used at LOTT in Olympia, WA seemed appropriate. Utilizing aggregate as sediment filters, and mid-line syphon flow pipes to allow proteins, oils, fats & detergents to sit on top, the water leaving stage one should be fairly well cleaned without the need for filtration or treatment.

Stage two is a smaller version of stage one, partially sunk into the ground to aid flow angles. A final sediment filter/POFD separation should allow the outflow to be mostly free of contaminates by the time it settles into the planned pond feature. This pond will utilize an impermeable liner, small gravel bottom, and water-borne plants to hold and biologically filter the final stage. A solar-powered submersible pump is recommended to allow for circulation of the water and discourage mosquito growth.

Concept Sketch of the Stage Three Pond

The final step is to allow for two perforated pipes (leech lines) to be directed back at the hillside where the water currently drains now. This will continue to create and encourage a wetland micro climate below the showers. With the addition of some water-loving plants, everything from herbaceous groundcover that can serve as chicken feed, to fast growing fodder plants, pleasant flowering shrubs, and even a small shade tree can be planted to take advantage of this additional water.

Map of the greywater reclamation system proposal.

This area, once planted, could serve as an additional ‘Chill Zone.’ It’s location relative to guest lodging, unique wetland plants, shade tree, and central water feature would make a wonderful spot to place some simple earthen benches and give guests a place to sit and listen to the water babble through the submerged pump.

I hope this design can inspire a future greywater reclamation system in that area. The land holds a lot of potential. I hope to return to see it transformed in the near future!

A professional artist’s professional rendering of the system on site, before additional planting.
A vision of a possible pond and seating area for future guests.