Radicchio Tasting Lab

Held on October 6th, 2022 for the undergraduate program, Forest, Farm, Shellfish Garden: Experiential Learning

IMPORTANT RESOURCES FOR OUR RADICCHIO TASTING

We will be making a version of this salad
to try after evaluating the raw radicchio.
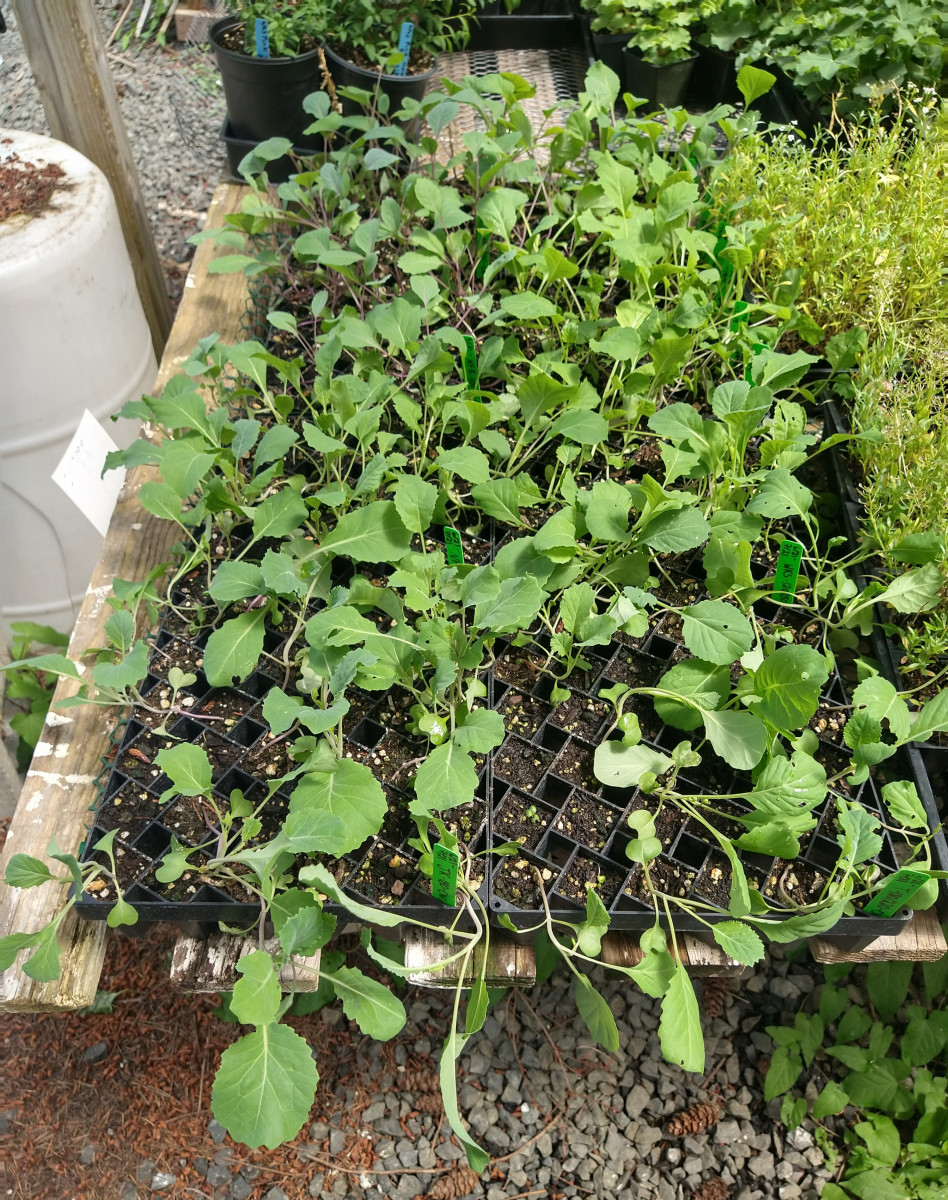
Image by Sarah Williams.
This winter squash flavor wheel developed by Culinary Breeding Network shows examples of descriptive words one might use to evaluate food. There are multitudes of flavor wheels available online that help tasters of cheese, beer, wine, etc.
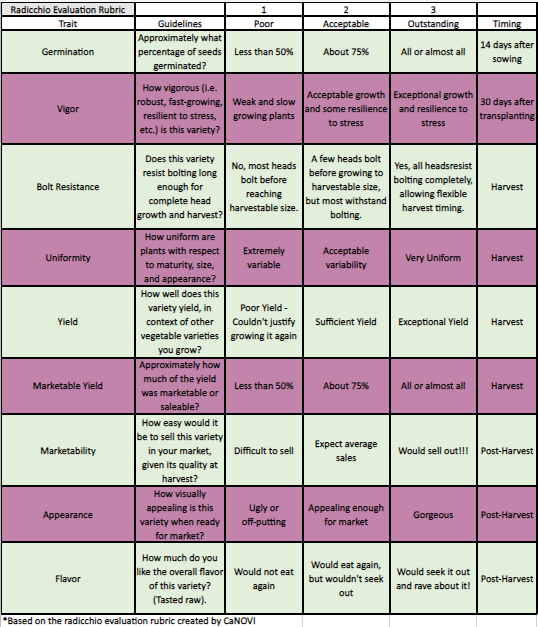
Image by Culinary Breeding Network.

WHAT IS RADICCHIO?

Radicchio is a type of chicory that was bred for a heading, leafy morphology. Often mistaken for colorful lettuce or red cabbage, it is a cousin of endive, and is botanically related to both the dandelion and the daisy. Radicchio is often called Italian chicory because of its prominent position in Italian cooking, and the vegetable frequently appears in recipes including salads, soups, risotto, pasta, and pizza. Most varieties of radicchio are named after the Italian region in which they are traditionally grown. 

WHAT DOES RADICCHIO TASTE LIKE?

Radicchio has a sharply bitter, spicy flavor, especially when eaten raw. While some people find this distinctive bitter taste challenging, there are ways to soak, cook, and/or balance the bitterness out of radicchio. 

RADICCHIO IS EASY TO PREPARE IF YOU UNDERSTAND HOW TO BALANCE FLAVORS

Before using, trim any brown off the stem and remove the limp outer leaves. Radicchio is prepared like lettuce or red cabbage depending on the variety. 

  • Soaking: Radicchio owes its characteristic bitterness to naturally occurring chemical compounds released when the vegetable is cut or chewed. However, because these bitter compounds are water soluble, you can tone down the bitterness by soaking the cut leaves in water. To mellow the bitter flavor of raw radicchio significantly, soak the chopped pieces in very cold water for about 30 minutes before tossing into a salad. Radicchio is wonderful when utilized as a salad green, but it is worth bearing in mind that a little goes a long way. In a leafy salad, radicchio should be used to provide a pop of color and a burst of flavor. 
  • Balancing Flavors: Radicchio is often paired with sweet, acidic, or salty ingredients to “soften” the bitterness and create a dish with balanced flavors. Because this bitterness can be intense, pairing radicchio with the proper complimentary ingredients is key. Acidic foods like fresh citrus juice, briny items like olives or capers, sweet pairings like honey, figs, and stone fruit, or fattier ingredients like olive oil or bacon counterbalance the bitterness of the radicchio, creating interesting but harmonious flavors. In turn, radicchio’s bitterness can help balance other flavors, particularly in salads that contain rich ingredients, such as cheese, nuts, or fruit. 
  • Cooking: The bitter flavor of radicchio is most tamed with proper cooking. Potent flavor compounds in the radicchio break down, unearthing a softer side with an underlying nutty sweetness. The degree to which radicchio is cooked affects how much its taste changes.  
    • In Italy, the colorful vegetable is often sautéed then added to pasta dishes, risotto, and stews to balance the richness. 
    • Roasted or grilled wedges are a tasty side dish on their own or can be added to other dishes like pasta, risotto, or pizza.  
    • Radicchio can also be sautéed or braised, much like cabbage, and served as a side or stuffed into poultry. 

Culinary Breeding Network

The mission of the Culinary Breeding Network links growers and eaters in a quest to add radicchio to the agricultural landscape of the Pacific Northwest. The goal of the Eat Winter Vegetables project is to increase production and consumption of eight winter vegetables in the Pacific Northwest, including radicchio. The project focuses on high quality varieties that have proved to have good yield, winter hardiness, storability and market potential in past vegetable variety trial research projects. The Sagra del Radicchio focuses in on radicchio and its place in the PNW agroecosystem and food culture.

A FEW NOTES ON FLAVOR

Before participating in a tasting, it is important to understand how you experience flavor. Flavor as described by The Flavor Bible is a combination of taste, mouthfeel, aroma, and “the X factor”. Taste is what is perceived by the taste buds: salty, sour, sweet, bitter, and umami. Mouthfeel means temperature, texture, piquancy, and astringency. Aroma is about aromatics and pungency. “The X factor” accounts for memory, and other physical, emotional, mental, and spiritual factors.

Image from The Flavor Bible.

TIPS FOR PARTICIPATING IN A TASTING

  1. Before you eat the food, use your other senses. Take a moment to jot down notes on appearance and aroma.
  2. Write down your first impressions…and your second impressions. As the tasting progresses, you may go back, re-taste a sample, and change your ratings. Reflect as you go.
  3. Eat a small portion of of the food, roll it around in your mouth as you chew. You can either swallow the food or spit it out. After doing so, suck air into your mouth and nasal cavity. Pay close attention to the flavors and aromas that appear when you complete this retro nasal breathing activity.
  4. Cleanse your palate between items. When tasting, drinking a bit of water between varieties can prepare and freshen the palate.

COOL RADICCHIO RESOURCES (NOT REQUIRED, BUT NEAT)!

September 1st-September 30th

FINAL INSECT DATA COLLECTION AND INSECT DAMAGE PERCENTAGE DATA

As I went through the field collecting my last week of insect data, I was truly impressed by the size of my plants. Remembering the days just after transplant, I am at turns shocked, impressed, and proud at their survival. The insect damage charts are particularly telling in terms of when certain pests appeared in the field this year and their pervasiveness. Were some student to continue trialing cabbage in particular, it would be interesting to see how those appearances change with the shift in climate.

CREATING A SCIENTIFIC POSTER

Having spent the summer collecting massive amounts of data, September was spent as time of analysis. SURF fellows are expected to produce a scientific poster for their projects, and the file was due for delivery to the coordinator no later than September 17th. I chose three areas of research to present in my poster: germination, vigor, and insect damage percentage. My poster follows the conventions of the excellent scientific poster design examples presented by Colin Purrington on his website. I attempted to keep the wording on the poster brief and to the point, allowing my visual data to do most of the talking.

FIELD SIGNAGE

FIRST HARVEST

After developing a tentative harvest schedule, I also made my first two harvests on at the end of September. After much discussion with my supervisors and Andrew, I decided to harvest heads as they each become ready, as opposed to harvesting all of each variety at the same time, creating the space for excellent tasting produce as opposed to strict data collection.

Radicchio was supplied to the farm’s CSA and market stand. Educational material was produced for customers explaining what radicchio is and how it is prepared. I also included five radicchio recipes that showcase its many culinary uses. I decided to use this initial material to build materials for the radicchio tasting planned for October 6th.

Week 10: August 22nd-August 28th

By Week 10, The plants had gained a significant amount of size and were ready to be evaluated for vigor. Andrew and I measured each plant for height and width, which I then used to calculate an area for each plant. We assessed each plant for insect damage on the same day, and the total time for both processes took four hours in total.

After entering the raw data into Excel, I found the median area for each variety, and from there was able to assess the mid-range, as well as the upper and lower area ranges. The graphs I produced from this data show the success and deficiencies of each variety in terms of mass one month after transplant.

Cabbage vigor raw data
Radicchio vigor raw data

We also began to see some lower leaf damage in cabbage plants, but after clearing the dead plant tissue, the problem seemed to correct. We also began to see bolting in certain varieties of radicchio, which will be assessed as a whole at harvest.

Week 9: August 15-August 21st

Week 9 continued the pattern of the previous week, with evaluation of insect damage. I started to see damage from of Pieris rapae, or white cabbage butterfly, and even saw caterpillar plant predation in progress.

Dr. Angelos Katsanis walked me through identification of beetle and butterfly eggs on plants in the field, explaining the ladybug eggs are generally laid in areas near aphid infestation. I was tremendously vigilant going forward and watched as within a week aphid damage began to increase.

Week 8: August 8th-August 14th

Week eight was spent caring for the field and collecting insect damage data. Looper damage in the cabbages began to disappear, only to be replaced by slug damage. Additionally, voles or some sort of ground rodents have begun to create hills throughout our field. Overall, the plants seemed to adapt well to the field and were beginning to put on size.

I also took time this week to repot all the remaining starts from our trial and separate them for different interested parties to plant in their own “baby trials”. I was able to supply Dr. Martha Rosemeyer, Dr. Sarah Williams, the Taste program community garden plot, Caleb Poppe, and the Organic Farm trays of starts that were left over from planting.

Week 7: August 1st-August 7th

Waiting and Watching

Because the trial was finally in the ground, the period of observation and evaluation began for the trial. Andrew and I did a small amount of scuffle hoeing to keep the weeds down and irrigated the plants as needed, as the temperature dropped and steeply raised again. The plants handled the shock of transplant with varying degrees of vigor, and die off was experienced in several cabbage varieties, as well as a couple of radicchio varieties.

I began collecting insect data in earnest this week, monitoring types of insect damage and evaluating the percentage of damage to each plant. Dr. Angelos Katsanis supervised my entomological data collection and met to discuss plant damage, probable pests, and methodology.

And Educating

This week also offered multiple opportunities to educate students and visitors to the farm about our field trials. Olympia Freedom Farmers, POF students, and community members all stopped by to see the field and ask questions.

Week 6: July 25th-July 31

Monday, July 25th was planting day! Andrew and I started planting in the morning, but had to stop at mid day because of the heat. We were joined again by Dr. Sarah Williams and Ali Bailey that afternoon and finished putting in all of our plant starts. We finished late, after a gruelingly hot day, and to be honest, the plants had suffered. We were all worried that the small starts wouldn’t survive the heat. But, we irrigated heavily, hoped that the plants would be strong enough to survive the shock, and monitored them closely for the rest of the week.

Week 5: July 18th-July 24th

GERMINATION EVALUATION

I was finally able to return from quarantine on July 21st, which was actually perfect timing for evaluating germination in the radicchio and cabbage–one month after sowing. I was grateful for the stationary job in the Red Barn Greenhouse (RBGH); frankly, my health had been ravaged by COVID and I was struggling to stand or walk for long periods. Andrew and I worked through the flats of radicchio and cabbage, counting the two to four inch tall seedlings by using chopsticks to distinguish each row. One of the consequences of neither of us being on site for two weeks was the entanglement of the plants, which slowed our counting down. The cabbage in particular was twisted as opposed to standing straight, which I attribute to the lack of rotation during my quarantine.

FIELD PREPARATION AND THE FIRST HEAT WAVE

July 22nd to July 24th were three, twelve hour days of field preparation.

On Friday July 22nd, Dr. Sarah Williams, Carli Fox, and Ali Bailey cam to the field to help Andrew and I weed the edges of our field, erect signage, and place irrigation.

Andrew ran the BCS power harrow as I collected he material for our irrigation. After harrowing our beds and marking our paths, we began installing two drip irrigation lines per bed. We nestled the irrigation lines between rows of already two foot tall buckwheat, preparing to irrigate them through the hot summer.

July 23rd was an entire day spent installing black plastic mulch over each bed. The heat was rising and the repeated process of trenching, laying, and burying the plastic was time consuming and hard on my recovering body. Andrew was truly the hero of the day, laying four beds to my two and cheerleading me the entire way. At the end of the day, we spent about an hour placing flags to mark the individually coded plots in each bed.

On July 24th, we spent the day fixing irrigation issues, dibbling holes for 360 plants, and amending each of those holes with a tablespoon of feather meal. We were hoping to start planting, but the hard clay in the field took far longer than we anticipated to drill through.

Weeks 3 & 4: July 4th-July 17th

COVID

These weeks were a blur. I tested positive for COVID on July 5th, after a weekend visiting my partner in Seattle. I visited the farm on July 4th to observe the newly germinated plants, and by the next morning I was sick and testing positive. This was my second time having the virus, and I was put out of commission and into quarantine for over two weeks.

Andrew was traveling abroad in Europe during almost the exact period of my quarantine, so much of the watering of our greenhouse seedlings was owed to farm manager Beth Leimbach. Dr. Sarah Williams was kind enough to take several sets of pictures, with which I was able to complete germination evaluations for the buckwheat varieties and email those evaluations to Annie Salaski at WSU.

I spent my quarantine time deciding on the details of my planting plan. I researched different types of mulch, amendments, and irrigation, as well as developing rubrics for evaluating radicchio and cabbage.

Week 2: June 27th-July 3rd

Monitoring Germination

Week 2 was mostly about caring for our tiny sprouts, both in the greenhouse and the field. The buckwheat germinated within 3 days, and we were vigilant in weeding with a scuffle hoe to protect the new crop from weed encroachment.

The trays in the greenhouse were germinating by July 1st, though there were notable inconsistencies in germination times between varieties. We committed to consistently rotating the trays in order to remove as much variability as possible to the seedlings.

Trays germinating in the heated greenhouse.
Image by Sarah Dyer.