Spring 2021 – Week 10 Summary

Content Warning: brief mention of sexual assault

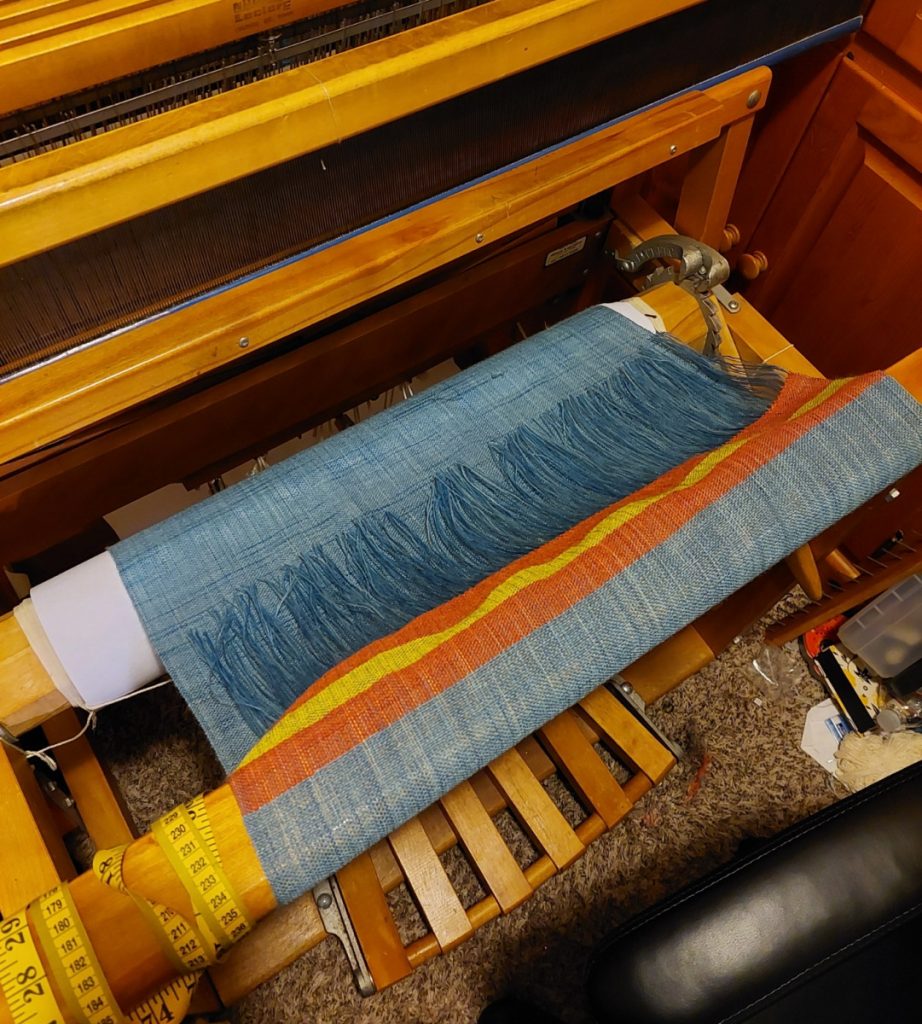
The last eight and a half months have lead to this moment: the moment I finished my project. I finished the last bit of sewing on Monday and immediately fulled it. Fulling a fabric after you’ve finished weaving it is quite important. At the very least, a handwoven textile should be finished by soaking it in hot soapy water; if you want the textile to be a bit sturdier, you full it. The simplest way to full (and the only way I have experience with) is to do the steps for creating felt without going so far as to actually create felt: you soak the textile in hot soapy water and agitate the heck out of it.

I made my life a bit harder at this step by not buying a bucket or large container in which I could do the fulling. I also didn’t want to fill up my bath tub because that would use more water than I needed. Luckily, my fiance and I had just bought the day before a new rubbish bin for the kitchen that we hadn’t used yet. So, I placed it in the bathtub and fulled my himation inside. It worked like a charm! And it was definitely a workout; I forget the wool can absorb nearly half its weight in water, so fulling became an arm workout. Once I finished fulling, I hung it up to dry above my bathtub using hangers to hold it up.

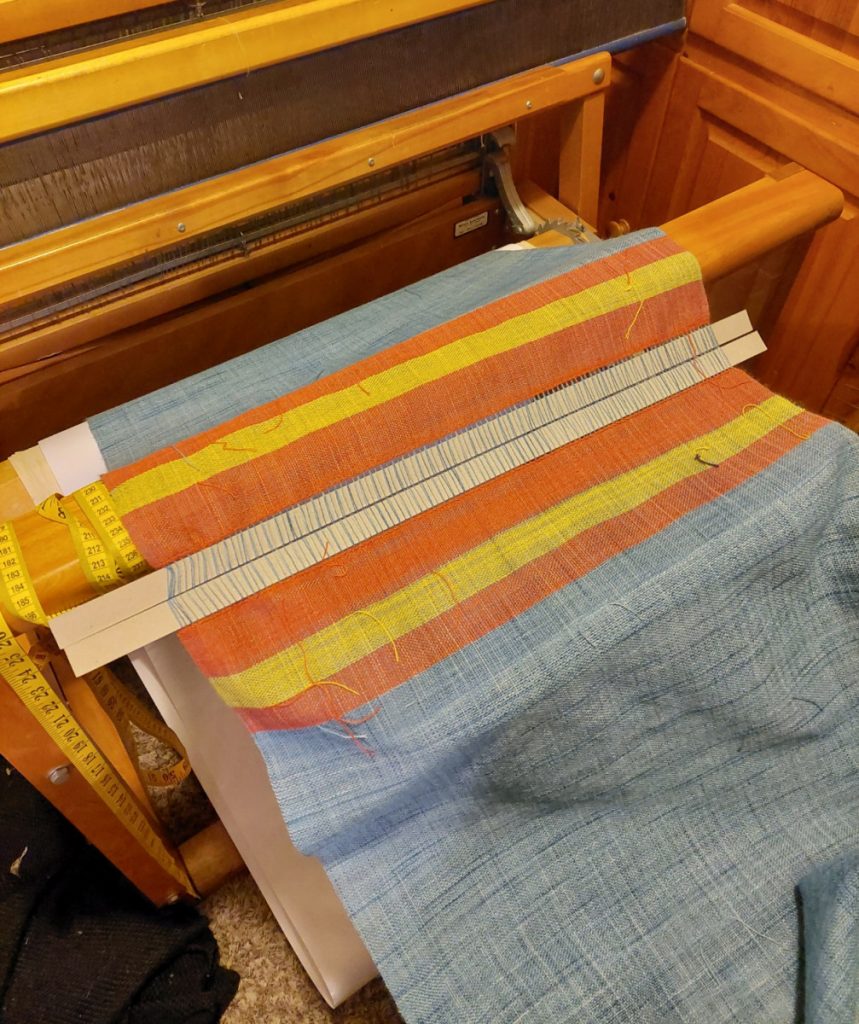
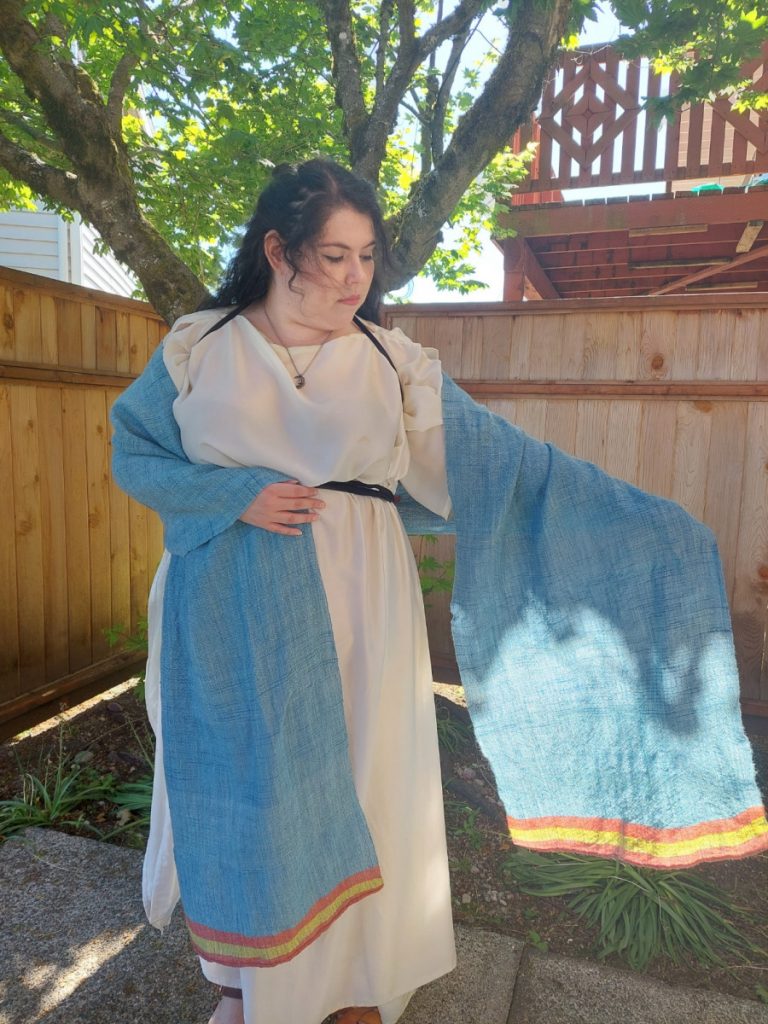
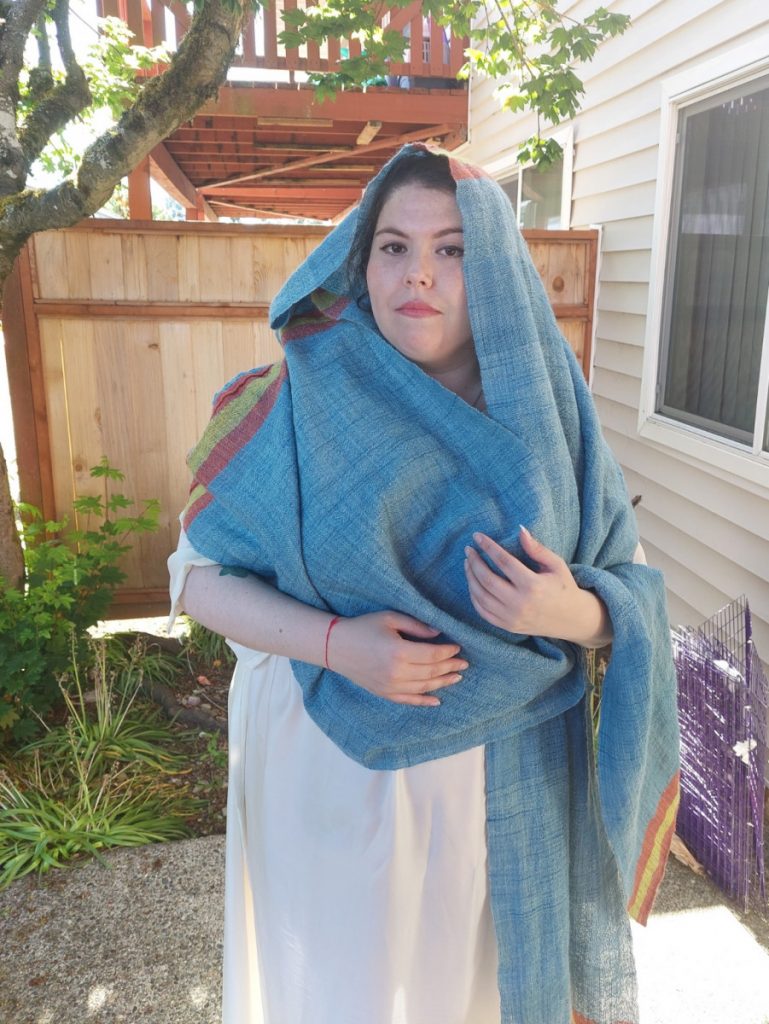
The next day the himation was fully dry and there was only one step left: to cut off the little tails of weft I left in while leaving. Now that the himation was fulled and definitely not going to fall apart anytime soon, it was safe to trim those tails. And then…I was finished. Three quarters of fiber work and this is the result:

I’m not great at admitting when I’ve done something cool or impressive, but even I have to admit: this is impressive. I also felt the need to model the himation to demonstrate how it would have been worn (and perhaps to show off, I will not lie).

All that was left after this was to present to the Terroir/Merroir program, write my Academic Statement and self-evaluation, and catch up on all of the weekly summaries I forgot to keep doing. Writing this post is one of the last things I’ll do as an undergraduate student.

This school year has been wild. I’ve spent a good time alone because of the pandemic. I made a garment by hand completely from scratch (well, nearly as I bought the warp yarn). Many tears were shed: from frustration, anxiety, pain. There was a good amount of pain. I bled several times from the combs, scalded myself a couple of times while dyeing, and used my body to the breaking point while spinning and weaving. I have a completely different perspective on clothing now. If I was paid minimum wage for every hour I spent on my himation, the dollar amount would be $3,264.31. The concept of Slow Fashion has never been clearer to me and I think I will visibly flinch when I walk by stores such as H&M and Forever 21, with their $5 shirts and $30 dresses. That cost is asinine and speaks volumes about the lives of the people who actually made those clothes. The story is there for anyone who cares enough to listen.

Something I wish I had done this quarter was read. I bought a great book for the quarter titled Spinning Fates and the Song of the Loom: The Use of Textiles, Clothing, and Cloth Production as Metaphor, Symbol, and Narrative Device in Greek and Latin Literature. I had wanted to incorporate this book into my learning after reading, “Women’s Work: Spinning and Weaving in the Greek Home”. I was struck by an idea the author brings up:

“…or is the production of textiles merely a literary topos, which serves mainly to remind us that Greek men conceived of women as spiders who trapped unlucky men in their webs? …The study of textiles in Classical Greece is a complex tangling of two realities: physical reality, where flesh and blood women transform wool and flax into tunics and blankets, and psychic reality, where metaphorical women spin out the lives of men, and the Fates (always women) cut the threads to kill men, and where Circe traps helpless men in her complicated webs.”

Part of why spinning and weaving were assigned to women in ancient Greece was to “keep an eye on them” – to control them. Women were seen as liminal and therefore dangerous. In essence, a bunch of patriarchal garbage. But anyone who takes a deep dive into Greek mythology (and I have, I’ve been obsessed since I was a child) will notice that spinning and weaving are used in clever and dangerous ways by various feminine entities. There is, of course, Arachne, whose weaving skills were so renowned that Athena herself challenged Arachne to a test of skill; Arachne’s dangerous defiance of the gods transformed her into a spider, so she may weave forevermore. Medea kills the new wife of Jason, who Jason set aside Medea for, with something she weaved. Herakles dies from a poisonous garment his wife, Deianara, gave him; she thought the poison was a love potion that would keep Herakles from straying. Even Penelope, the patient wife of Odysseus and seen as the perfect example of how a woman should be, kept her suitors away by undoing the shroud she was weaving for her father-in-law; Penelope declared she would choose a suitor once she was done with the shroud, but would undo most of her day’s work to deceive the suitors. And the feared Moirae, the Fates, who all – human and god – were at the mercy of, were depicted with a spindle. Clotho spun a person’s destiny, Lachesis measured the length, and Atropos cut the thread.

This motif seems to exist outside of ancient Greek mythology. I didn’t have much time to explore this, but off the top of my head I know that Valkyries, the battle maidens of Odin who carried off fallen warriors to Valhalla, have an association with weaving. Though, their example is gruesome: they weave with the entrails of dead men and their loom weights are severed heads. Spinning and weaving are not safe activities. There is power to be found in these crafts, in so-called “women’s” work.

Weaving is an act of defiance, which I feel is best illustrated by the ancient Greek story of Philomena. Philomena was the sister of Procne, who was married to Tereus, king of Thrace. Tereus lusted after Philomena and, not caring that she was his wife’s sister and taking full advantage of the power that he had and she didn’t, raped her. Tereus goes even further and cuts out Philomena’s tongue so she can’t tell anyone what happened. So what does Philomena do? She weaves her story, her trauma, and pain into a tapestry. She shows this to her sister, and Procne avenges her by killing her own son with Tereus and tricking him into eating their son .

Tereus tried to take away Philomena’s voice and power. But Philomena used that dangerous skill of weaving in order to reclaim her power. She remained defiant of the society that oppressed her and condoned her trauma. The consequences to Tereus are devastating. In a society that would not allow women a voice, the women of ancient Greece, at least in the myths, used the skills that they had to their advantage. They told their story through fiber arts.

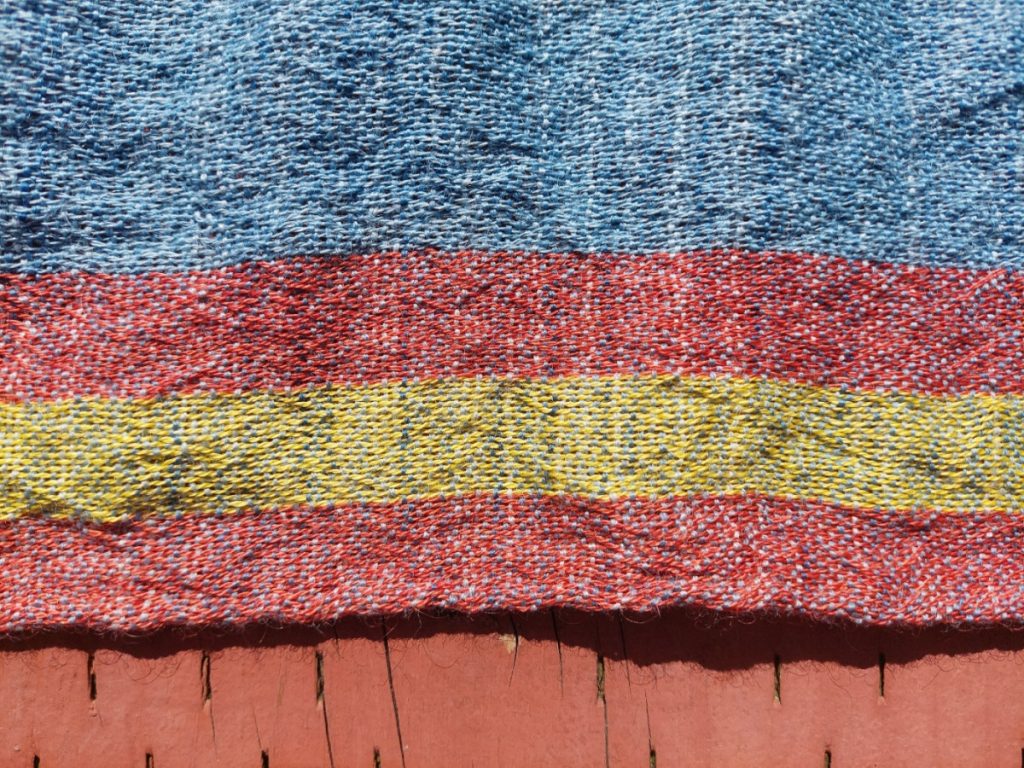
And so is the case for me in my himation. Yes, it looks like a long blue, red, and yellow piece of fabric that will keep me warm when the winter months come upon us again, but it’s so much more than that. My himation tells the story of my final year at Evergreen; it is the culmination of 15 years of working towards my BA degree. Fibers of loneliness, isolation, and fear spun along with wool speak of the COVID-19 pandemic. It is soaked in the tears shed due to the physical and mental anguish I experienced while doing this work. It is dyed using knowledge I sought out to connect with my ancestors, so they, too, are in my himation. Intertwined among the warp and weft are all of my thoughts, feelings, and memories that came up while creating it. Finishing it is my expression of defiance – defiance in the face of those who did not believe in me and didn’t support me. My himation is the story of myself.

Ross, Nicole. n.d. “The Heroic Rapist in Context: Rape Culture Examined Through Western Classics – Nevada State Undergraduate Research Journal.” Nevada State UndergraduateResearch Journal. Accessed June 9, 2021. http://nsurj.com/v5-i1-1/.
Carr, K. 2000. “Women’s Work: Spinning and Weaving in the Greek Home.” In Archéologie des textiles: des origines au Ve siècle : actes du colloque de Lattes, octobre 1999, edited by Dominique Cardon and Michel Feugère. Montagnac: Editions Monique Mergoil.

Spring 2021 – Week 9 Summary

The middle panel was finished very early on this week. I didn’t have much blue yarn left; I think the panel only took 12 to 14 hours to weave and hemstitch. It was somewhat of a surreal moment when I cut the middle panel off the loom. As I was doing so, I acknowledged the fact that the weaving is over. This activity that I had prepared for over the span of two quarters was now done. The weaving went by so fast that it was surprising to finish!

The completed middle panel before I cut it off the loom. If you look closely, you can see the other end of the panel underneath the warp threads. There was no way I could have woven two more panels and I’m so glad I didn’t decide to be stubborn and try.

Now it was time to sew the panels together and hem the edges. Before I started I watched a few videos on YouTube to see if there was any recommended way of hemming handwoven textiles, but all of the videos used sewing machines, which I do not have. I found an historic sewing channel that had so many great videos on hand sewing that I almost became distracted. But, sewing is a skill that I will focus on another day. In the meantime, I hemmed the edges using what was left of my weft yarn and secured the ends by inconspicuously weaving them into the fabric. There isn’t a single knot in my himation, which for some reason I’m proud of. I can’t explain why. Maybe all of the hours sitting alone in my craft room have finally gotten to me.

First I hemmed what I decided would be the outside edges, then sewed the middle panel to each large panel. I did one large panel at a time, sewing the panels together, then hemming the edges. I was really glad I had hemstitched everything, because I was a bit rough in handling the fabric; it became rather unwieldy as the pieces came together. Sewing also took longer than I thought – it took over 15 hours. One day I’ll accurately estimate the amount of time I need to do something…but that moment was not while hemming.

Spring 2021 – Week 8 Summary

I had good news and bad news this week. First, the good news: I finished the first two panels! The tension issues never really went away, but I persevered and made it through the second panel. It was terribly satisfying to unroll the panels off of the front beam and cut them off the loom. I bought new scissors specially for fabric so I wouldn’t make a mess when cutting them off.

The bad news: these are the only large panels I will weave. As I neared the end of the second panel, I quickly realized that I wasn’t going to have enough weft yarn to do another panel, let alone two. I’m somewhat perplexed on how this happened, but going forward whatever calculation I do to determine the amount of weft and warp, I’m going to double it to make sure I have enough. Looking at the panels, I can see that the sett I wove at is not the one I used in my calculations; I used a 12 wpi (wraps per inch) for calculating the weft, but in practice it was more like 15-17. But, if the panels actually had only 12 weft threads per inch, the fabric would have been like gauze and not a balanced weave at all. Like I said, I’m still technically a beginner. It’s a lesson learned.

So my chiton will now be a himation. A himation is a long rectangular piece of fabric that was worn in different ways, depending on the gender of the person. Men, starting in the 6th century, would wear a himation as their main garment and women would wear one whenever they wore a chiton. It would have been strange to wear a chiton without a himation. The himation was usually made of wool and there were proper and improper ways to wear it, especially for men. Women might wear a himation as a veil, use it as a baby carrier, and was even used by dancers .

I had some blue weft left, so I decided to warp the loom again and weave the rest of the blue yarn into a smaller panel to sew between the other two larger panels. I didn’t want to sew the two panels together as-is, since there would have been two sets of stripes in the middle with only one set on the ends; I felt it would look better stylistically to have a blue panel to break up the stripes. So I cleaned up the loom of scrap yarn and proceeded to warp it again. Sadly, the warping process was no faster even though it was my second time doing it. This time though, I took off a part of the front of the loom (the bottom part that holds the reed) so I could reach the heddles easier and not sit in a very awkward position. It was a piece that isn’t really meant to come off, but I was inspired by the memory of the terrible back-ache I had the first time I dressed the loom.

The beginning of the middle panel.

Once I finished dressing the loom, I wound up the rest of the blue yarn onto bobbins and began weaving. It was evident very quickly that I had made the right call – I didn’t finish the middle panel this week, but I could tell that I would have been upset had I attempted to weave the other two panels as originally planned.

Lee, Mireille M. 2015. Body, Dress, and Identity in Ancient Greece. Cambridge University Press.

Spring 2021 – Week 5 Summary

Week five, along with the rest of the weeks of the quarter, was spent weaving most of the time. This week started off a bit slow. I had planned to create a pattern in the yellow stripe by using supplementary weft. I think I mentioned supplementary weft before, but to refresh the reader’s memory: it is a secondary weft thread that is used along with main weft to create patterns. My plan was to weave in a pick (a row of weft) of yellow yarn, and then by lifting specific warp threads weave in a pattern of purple yarn.

What I thought would be a mostly simple process turned out to be much more complicated than I had hoped. In the places that the purple thread was above warp threads, the yellow thread was behind the purple thread and, in theory, should be hidden. This was not the case. I soon realized that I should have used a thicker yarn for the purple weft in order for it to stand out. I spent four hours trying to make the pattern work before I gave up. I’m quite stubborn and if it wasn’t for the fact that I had limited time to finish the textile, I probably would have spent another four hours trying to discover a way to weave in a pattern that showed up. Instead, I had to give up the idea. I’m tempted to embroider the design after the chiton is finished and off the loom using the purple yarn, but we’ll see.

I spent four hours weaving, un-weaving, and re-weaving the same four rows of weft. The fourth row was usually when I would see that my current method wasn’t working.

Once I decided to stop trying to make the pattern work and just weave, the weaving came along quite quickly. Weaving is a much faster activity than spinning, and for whatever reason I found it to be easier on my body than spinning. This isn’t to say weaving is easy – I’m still constantly moving and stepping on pedals to lift the shaft, which aren’t light. It is a little easier on my back, though, as I’m not hunching as much. Weaving forces me to sit up straight, actually. So, that’s an upside to weaving as well.

I forgot to mention that before the great Pattern Crisis, I had to decide what tool I wanted to use to weave in my weft. One uses a shuttle to do this, but there’s a few different types. One type is a stick shuttle, that looks more or less like you think it would: it’s a long flat stick with notches on the ends. A weaver passes a stick shuttle through the shed (the shed is the space between raised and non-raised warp threads) in order to weave in a pick of weft. Another type of shuttle is a boat shuttle, which is a piece of rectangular hollowed out wood (though I suppose it could be made out of other materials). Instead of passing the shuttle through the shed, you throw it and it glides across the non-raised warp threads; the ability to do so easily is helped by the fact that a boat shuttle is pointed on the ends for aerodynamic reasons (I’m assuming because I can’t think of another reason why a boat shuttle is designed this way).

A boat shuttle. After using this, I’m not sure if I can ever go back to stick shuttles (you can see a stick shuttle in the previous photo!)

I had only ever used a stick shuttle before, but I knew that using a boat shuttle would probably make my life easier. With a stick shuttle, every time I ran out of weft, I’d have to stop and wind more on by hand. A boat shuttle uses bobbins that you winds yarn on using with a bobbin winder. Bobbin winders come in many types and I went with the cheapest option, which is an attachment for a power drill. I bought 10 extra bobbins and loaded them up with weft before I started weaving. It only took about 30 minutes to do 10 bobbins, so even when I inevitably used them up, it didn’t take much time to fill them up again. It’s quite nice, and I imagine that generations of weavers would have loved having that option – winding onto stick shuttles is kind of a pain.

Here’s what winding yarn onto a bobbin looks like. All I have to do is hold down the power button the the drill and and yarn is quickly placed neatly onto the bobbin. I have to admit, it was kind of fun.

Spring 2021 – Week 4 Summary

Ah, this is the week that I dressed the floor loom. I’ve never used a floor loom before – it’s quite a bit more complicated to use than my rigid heddle loom. There were many steps; I’ll do my best to explain what I did to get the loom ready to weave.

First – I had to get the loom into my craft room. For the past six months it’s been waiting patiently in my front room for the day I would be ready to use it. I had originally planned to use it in the front room, but my partner and I realized this would have made our lives very complicated. Moving the loom wasn’t easy. For starters, it’s probably about 100 pounds. Also, we learned that it was just a bit too wide to fit through the door frame, so I had to figure out how to remove the pedals in order for the loom to fit. Once it was in the craft room, it needed a bit of cleaning and maintenance. The brake on the back beam is quite rusted and wouldn’t move, but luckily the oil I use for my spinning wheel helped loosen the brake and allowed me to rotate the back beam. I also had to reorganize the heddles, as they weren’t evenly divided up among the four shafts and some were damaged. Organizing the heddles meant removing the shafts, which took me a bit to figure out how to do so. Right – I had no manual to the loom and the online instructions the company that produces this particular loom gives look and read like the were created in the 1970s or ’80s. It was interesting having to figure out how to use the loom all on my own, to say the least. I got there in the end, though!

This is the back of the loom. Before I can wind the warp onto the back beam, it’s good to make sure the warp is spread evenly out. The piece of wood with nails in it is called a raddle. The space between two nails is one inch, so I can easily put my groups of 15 warp threads between each space. This helps to keep the tension even.

Once the loom was ready, I had my partner help wind the warp onto the back beam. This is a very important and crucial step, as not only does this start the process of dressing the loom, but it also requires that the warp winds on to the back beam at an even tension. Uneven tension can and will cause issues as you weave – I unfortunately have first-hand experience. My partner rotated the back beam for me while I held onto the warp. Once the warp was on the back beam, the next step was to thread the heddles. Even though I’m doing plain weave (weft goes over one warp thread, then goes under one warp thread, rinse and repeat), I’m using all four shaft in order to distribute the weight – if I had 165 heddles and warp threads going through one shaft, it might make raising the shaft a bit difficult or require more effort for me when I step on the peddles. I threaded the warp threads where the first thread went through a heddle on shaft one, the second thread through a heddle on shaft two, etc.

It may be hard to see, but the numerous slender metal things are the heddles. There is a small opening in the middle of each one into which I thread a single strand of warp. The sticks help to preserve the criss-cross I made that keeps all of the threads separate and in order.
A close-up of the warp being threaded through the heddles. You can see much easier the opening in the heddle that I mentioned. Every 15 threads I half-tied up in case I had a bout of clumsiness – I honestly would have cried if I had accidentally pulled all the warp strings out.
All 330 threads of warp threaded through the heddles.

This. Took. Hours. It was tedious and painful because I had to sit awkwardly at the loom, leaning over and hunching at the same time. Just this part took nearly six hours, and once I threaded all 330 warp strings in the heddles I had to thread the warp again, this time through the reed; this part is usually called sleighing the reed.

The reed is what all of the warp threads are sticking out of in this photo. It’s called sleighing the reed because the part of the loom that holds the reed is called the sleigh. It may be hard to tell but the reed sort of looks like a very large, very fine comb.

Sleighing didn’t take as long, but it was still about another three hours. Once I finished that, I could finally tie the warp threads onto the front beam, which sounds simple, but can also cause tension problems if not done well. All in all, it took me about three days to get the loom ready to weave.

The loom tied onto the front beam – the loom is now dressed and ready for me to weave!

I have to admit, I was pretty proud of myself. I also can see why, long ago, weaving was a group activity. I would have had a much harder time with some of the steps if I didn’t have my partner to help me. Threading the heddles and sleighing the reed would have gone much quicker if I had someone else doing it, too. If this had been a group activity, we could have taken turns threading the heddles, which would have lead to nobody being in much pain because we could rest. Instead I ached for days. I could have taken my time, I suppose, but I’m also on a time limit to finish my chiton. Now that I’ve dressed a floor loom, hopefully when I have to do it again later this quarter it will go faster.

Winter 2021 – Week 9 Summary

At week nine, I realized that I should probably figure out what I want my chiton to look like. I’ve been so absorbed in spinning the yarn that I forgot that I’d like it to, you know, have color. I had decided a while ago that I’d like it to be predominantly blue with some sort of border. I had been thinking of adding stripes to the top and bottom (and had been considering what that may look like when I was trying to fall asleep, which is never a good time to be thinking about schoolwork). I finally sat down and drew sketches of two possible variations and decided on which one I like best. As much as I love purple, I went with red to go with yellow, even though purple and yellow would have been complementary.

I would usually go with the blue, yellow and purple combo, but for whatever reason I find the blue, yellow, and red combo much more pleasing. Now I have to decide if I want to add any designs while weaving…

I then had to decide what I wanted to use to create these colors. Woad was a very attractive option, but very hard to find. Luckily, a friend of mine a while back sent me a UK source for woad powder. For red, I had been planning to use cochineal that I have on had, but then I thought, “Gloria, you should pick something you’ve never used before to make your life even harder.” So I chose madder. Madder is a very historical dye that can give multiple colors depending on how you treat the dye bath, the fiber, etc. I purchased from Maiwa in Canada, as I know they ethically source their goods. For the yellow, I decided to be ridiculous and use saffron. Yes, saffron is terribly expensive, but the yellow stripe I’m planning to weave in is small so I figured that I could get away with using such an expensive dyestuff. For the saffron, I ordered from Mountain Rose Herbs, as they too are committed to ethically sourcing the myriad of products they sell.

After deciding what dyestuffs I wanted to use, I then had to calculate not only the approximate weight of the yarn to be dyed blue, red, and yellow but also the amounts of each dyestuff I would need to dye the yarn. It was a lot of math. A LOT. But I really enjoy math, so it was a nice change of pace. I may have gone overboard to make sure my estimates were as accurate as possible by taking the average weight and yardage of each of the skeins I’ve spun so far to figure out how much the yarn allotted for each color would weigh, in both grams and ounces. What can I say, I like accuracy.

Winter 2021 – Week 8 Summary

I read a lot this week. I finished up Greek and Roman Dress From A to Z by Liza Cleland, Glenys Davies, and Lloyd Llewellyn-Jones and found Cleland’s dissertation online to read as well. The title is Color in Ancient Greek Clothing, which was able to tell me more about what would have been used as dye. There’s several useful tables on possible and confirmed sources of natural dyestuffs that I found fascinating; I had been considering researching the native flora of Greece to look for anything that could be dyed with – but someone else did it for me! Dyestuffs that had definitely been used for dye and had a word for it in ancient Greek were specified. Most, like madder and kermes weren’t surprising, but I learned a couple of new ones such as turnsole, Chrozophora tinctoria, and orchil, Roccella tinctoria.

Though I didn’t know it at the time, I finished spinning up the last skein of yarn that I’ll complete for this project. I still haven’t calculated the yardage, but it should be at least 400 yards. That means I spun more than 1700 yards, which is enough for the weft but not the warp. I’ve run out of time to spin yarn and I’ve come to accept this. I’ll have to buy the rest, but the fact that I spun at least the weft yarn myself is pretty amazing to be honest. I’ve learned that this is not easy work. It is not quick work. Making fabric by hand takes time and pain. Spinning for hours every day is exhausting; my legs are constantly treadling and my hands are constantly moving and making repetitive movements. My back would hurt and it was painful to move afterwards. And even after all of those hours of treadling and moving and hunching over my spinning wheel, I still didn’t spin enough for a single garment. The cost of this chiton in labor hours alone is enormous, and though I know most modern yarn and fabric is created with machine, I still wonder how in the world can people buy a dress for thirty dollars?

Winter 2021 – Week 7 Summary

I started to catch up my weekly posts in week seven. My depression has not done me any favors in terms of school work, but I started getting treatment again for it this week (side note: it’s helping!). I realize it may be weird to discussion my mental health issues in my ePortfolio, but I believe it’s relevant to how I approach my work, and I also try to be very open about this subject in order to alleviate the stigma around mental health.

Anyways, I did some more spinning and reading. I got lost down a bit of a rabbit hole in Prehistoric Textiles about weaving patterns and textile motifs possibly being the inspiration for many of the patterns painted on pottery. It did hurt my head a little, but I love that people have actually studied such niche things (the author, Barber, was talking about how the patterns that were perhaps woven onto Minoan textiles were used for decorating the walls of ancient Egyptian tombs). I’m unsure if I’ll weave any patterns onto my chiton – it’s going to be a whole ordeal warping the floor loom, as I’ve never done that before.

This is part of the ceiling in a 12th Dynasty in Asyut, Egypt; it dates to the early 2nd millennium BCE. In the book that this is in, Prehistoric Textiles, the author discussed how the designs in this and other contemporary Egyptian tombs have similar motifs painted on the murals inside, and that these designs can be found in ancient Minoan frescoes. The designs were mostly likely used on textiles as well as murals and pottery.

I also read the majority of Greek and Roman Dress From A To Z. Though, saying I “read” the whole thing is slightly misleading: I skimmed it for any and all words dealing with color and dyeing and took notes on those parts. It was interesting and it led to me to look into the etymology for indikòn, the Greek word for indigo. I wanted to know in what period did indigo started being used in ancient Greece, and I figured that if I could find out the earliest usage of the word indikòn, that might give me a good idea (or at least allow me to make an educated guess). Spoiler: the earliest usage was the first century CE, so the earliest period was probably the Hellenistic period, which is a bit later than the periods I’ve been trying to limit myself to studying. I’m so grateful for having friends who have degrees in Classics – without them I wouldn’t have been able to figure this out on my own.

This is also the week where I started noticing how much by body ached from spinning so much. My legs are constantly treadling my spinning wheel. Even though the treadling isn’t as intensive as being on an exercise bike, over time the repeated use of the same muscles day in and day out takes a toll. Luckily, I can take a break for a few days but I wonder about people in the past who couldn’t take a break, who needed to spin every day otherwise there would be no clothes or linens. I wonder about how much they ached or if they became used to it after a while. Perhaps, as they probably started spinning in childhood, they never ached all that much. I do not know and I wish I had a time machine so I could ask the spinners of the past myself.

This is random, but I wanted to share my notes. Most of the time I take reading is writing these notes. I’ve filled half of my notebook with notes like these. I kind of have to – there’s just so much information.

Winter 2021 – Week 6 Summary

I started this week off by winding my plied yarn onto my niddy noddy. I admit this is my least favorite part of the process. Winding onto a niddy noddy is important not just because it creates a skein – there are other ways of doing that – but using a niddy noddy allows me to make a very good estimate of how many yards of yarn I have. Every wrap around it is about 72 inches; if I count how many times I wound my yarn around the niddy noddy, I can multiply it my 72 and now how many inches I have, then divide by 36 to know the yardage.

I didn’t do this step this week, but I thought I’d share. This is the first step for me in plying yarn: creating a center-pull yarn ball. On the edge of the ball winder is a handle that I turn to wind the yarn single onto the contraption (unfortunately the handle didn’t make it into the photo). The upper platform spins on a tilt, which allows the yarn single to wind on in an even and orderly fashion. When all of the yarn single is wound on, I’ll have the end that I’ll be holding, but I’ll also have the other end sticking out of the center of the ball. By pulling from the center end and unwinding from the outer end, I can ply my yarn onto itself. Just doing this step takes me 45 minutes to an hour.

It’s just…very tedious. This last skein was wrapped around nearly 250 times. And I have to count them. It takes a while, as you can imagine. Winding onto the niddy noddy and counting the yardage took me an hour. It’s necessary, but just so very tedious and not particularly fun. Though, I suppose people would finding spinning tedious or doing all of the math not very fun at all, and I do.

I also read a bit. I’m supposed to write a post/essay on natural dyes (that I’m late with doing, sigh) and I also need to figure out with what I’m going to dye my yarn. I’d like to stick with dyestuffs that were used in the Archaic and Classical periods of Greece, but I’ll also probably use some of what I have on hand; I have an old dye bath of cochineal that I’ve been saving and perhaps I’ll use it for this project (dye baths can be saved and reused until the pigment is exhausted). There was a chapter about dye establishments in the book I checked out via Interlibrary loan, but it focused more how to ascertain if an area was possibly a place where large-scale dyeing took place and didn’t talk about the actual dyes themselves. I also read the chapter on dyes from Prehistoric Textiles, which was a bit more helpful.

Winter 2021 – Week 5 Summary

In week five I did a random assortment of things. I, of course, spun. I finished up another half-bobbin and plied it together. I never paid attention, but after logging my hours I realized it took me six hours to ply. It never seems like it’s that long and for some reason my brain never sees plying as a large endeavor, but it really is. Not only do I have to wind nearly 1,000 yards of yarn into a center-pull ball, I also have to spin the two ends the ball creates together; controlling the tension of each string and keeping a consistent amount of twist for all of it. It’s kind of intense and not nearly as relaxing as just spinning. But, plying makes the yarn stronger, which is important for warp.

I also spoke a bit about my work in a class my sponsor, Dr. Sarah Williams, teaches. I was pleasantly surprised that people found what I’m doing fascinating. I mean, I find it all terribly interesting, but that’s me. The purpose of me speaking was to help inspire her students for their own individual projects and I hope that I did indeed inspire.

I also received my Murex care package! Inside are Murex shells, dried glands, dyed fiber and fabric samples, and some of the pigment itself. I could use it to dye the smallest bit of yarn…but I kind of just want to keep it as a curiosity- how many people have Murex dye? The person who sent it, Mohammed Ghassen Nouira (here is an article about him and his work and here is the Facebook group where he shares his ongoing dye experiments) also sent me extra dyed wool fiber so I can spin it. It’s not a great amount, but it’s enough to create an adequate amount of embroidery floss. I’m not sure what I’ll use it for, but it will be for something very special.

There is a lot going on here. The three shells are Murex shells, You can also see inside the box the fiber and fabric samples. In the front on the left are the dried glands that are the source of the purple dye, and on the right in the glass jar is the smallest amount of the pigment itself.
So many colors! The range of colors are all produced from Murex dye. It all depends on how you process it.