Mordanting – Alum

For the rest of my dyeing projects, I decided I wanted to try out an easier method of mordanting. The rhubarb was great as a natural method for the process, but proved to be tricky because of the toxic aspect; it was annoying to have to ventilate my entire apartment and be wary of my roommate’s cat getting exposed. Alum (potassium aluminum sulfate), while still unsafe in large quantities, is considered to be the safest mordant to use. Not only does it act as a mordant, but it also helps to brighten the colors of dyes. Alum is considered non-toxic in small quantities, but still should not be inhaled or come into contact with skin.
Depending on the fiber used, a variety of assists may be necessary to aid the alum in the mordanting process. For animal fibers, cream of tartar can be used, and for plant fibers, soda ash can act as the assist. These assists help the fiber fully take in the alum during the process.
Mordanting with Alum
Materials
- Fiber
- Alum
- Cream of tartar or soda ash*
- Pot
- Scale or measuring spoons
- Heatproof jar
- Long-handled spoon
- pH neutral soap
1. Weight Fiber and Alum
Use 8% of the weight of the fiber in alum and 7% of the weight of the fiber in cream of tartar (amounts will vary depending on animal or plant fibers). The weight of my fiber was around 220 grams, so I used 17.6 grams of alum and 15.4 grams of cream of tartar.
2. Prewet Fiber
Just like before, always prewet fibers before dyeing or mordanting!
3. Pot of Warm Water
Fill a pot with room-temperature water, enough for the fiber to be able to move around in.
4. Measure Cream of Tartar and Alum
Put the measured cream of tartar into the jar and pour boiling water over it to dissolve. Once the cream of tartar is dissolved, add it to the pot of water and mix to combine. Repeat this step with the alum.
5. Add Fiber
Add the prewetted fiber to the pot and bring to a simmer. Cover the pot with a lid and let sit for an hour. Be sure to stir occasionally during this process to make sure the solution reaches all parts of the fiber.
6. Let Fiber Cool
After the hour is up, turn off the heat and let the fiber cool in the solution overnight.
7. Rinse and Wash
Take the fiber out of the solution and rinse with cool water. Wash the fiber with the pH-neutral soap and rinse. The fiber can be dyed in its wet state or can be dried for later use.
Dyeing – Nettle

After letting my nettle dye bath sit for three days, I discovered a film of mold over the top that smelled really awful. I was able to just skim the mold off to save the dye, but it was still disappointing to discover. After dealing with the mold, I went ahead with the dyeing process, dyeing one piece of wool I had mordanted with rhubarb and a white shirt I had mordanted with alum.
Hot Dyeing Method
Materials
- Fiber, pre-mordanted and pre-wetted
- Pot
- Stirring utensil
- Dye bath
- pH neutral soap
1. Add Fiber to Dye Bath
After adding the fiber to the dye bath, slowly raise the temperature of the bath to a simmer.
2. Simmer and Stir
Let the dye bath simmer for 1 hour with the fiber, stirring occasionally to make sure the dye is able to reach all sections of the fiber piece.
3. Let Sit Overnight
Leave the fiber in the dye bath and let everything cool after the hour is up. Let it sit overnight so the color is able to fully saturate.
4. Rinse and Wash
Remove the fiber from the dye bath after soaking and wring out excess liquid. Rinse the fiber under lukewarm water and wash with pH-neutral soap. Rinse out all soap and hang the fiber to dry somewhere away from sunlight.
Results


Honestly, these results were super disappointing. I forgot to get a before photo of the Evergreen t-shirt, but it was really just a white shirt beforehand; it seemed like the dye only slightly grayed both pieces. I guess the takeaway from this, though, is that some materials might not work for dyeing. One reason by testing the dye in advance is a good idea!
Shoe Dyeing

Finally! I was starting the process of dyeing my white Keds! I first went out to forage some fresh flowers from around the Evergreen campus. I gathered a variety of rhododendron flowers, some dandelions, a fresh marigold, and a bracken fern as well. When I came back to the apartment, I also gathered some other items as well, including foraged madrona tree bark and some dried marigolds that Caleb Poppe was very kind to gift to me.
I decided to not attempt to mordant my shoes. I wasn’t sure how to approach it since I did not wish to heat my shoes and potentially warp them at all. I also thought it would hopefully not be too much of an issue since the shoes would not have to constantly go through the wash and potentially lose color due to washing like an article of clothing might. The biggest threat would be color loss due to light exposure.
Bundle Dyeing – White Keds
Materials
- White Keds (optional)
- Fabric
- String or rubber bands
- Foraged material
- Light-colored vinegar
- Spray bottle
- Plastic bag
1. Lay Out Fabric
Make sure you have enough space to lay out the entire piece of fabric. The fabric should be pre-wetted, either right after the mordant process or after soaking.
2. Spray with Vinegar
Using the spray bottle, mist the fabric with vinegar until it is fully saturated. The acidic pH of vinegar helps with brightening colors. Some of my resources have also used vinegar as a mordant, including my high school art teacher, but other resources mention it only as a modifier because of its brightening abilities. Either way, be sure to use a light-colored vinegar, as the darker ones aren’t as effective in brightening colors.
3. Scatter Foraged Material
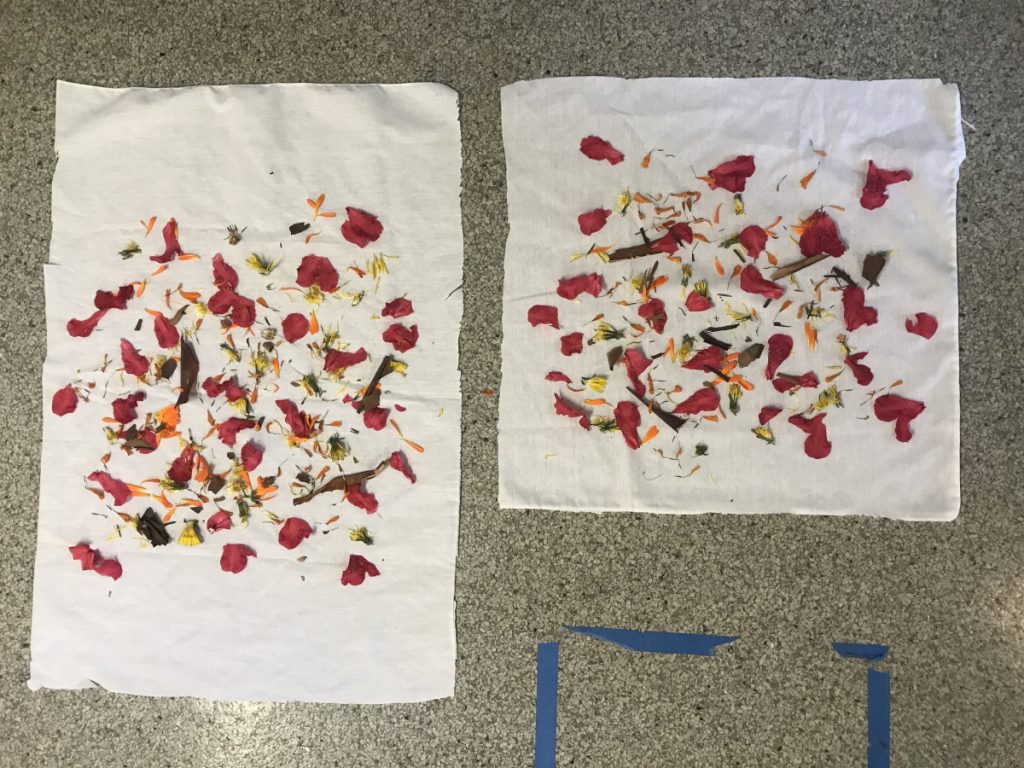
This is the fun part. Scatter the foraged material across the fabric. It can be random or planned out but don’t be too attached to a specific pattern, as these designs won’t usually stick. Have fun with the scattering! Break up flowers and leaves or leave them whole, leave blank spaces between materials. Just be sure to bring the material right up to the edge of the fabric so there isn’t a white border around the edge (I did not bring the material to the edges because of my focus on dyeing my shoes, not the fabric). The four specific plants that I used in my bundles were a deep pink rhododendron, madrona tree bark, dried and fresh marigold flowers, and dandelions.

4. Spray and Bundle
After the foraged material has been scattered, spray everything with more vinegar before starting the bundling process. If only dyeing fabric, there’s a variety of different ways to bundle, including a concertina fold like a paper fan or a rolling method. For me, however, I had to bundle up the fabric around my shoes, without disturbing the scattering of the plants too much. Below are the final bundled shoes, tied with string. Rubber bands would also have worked very well for holding everything together.


5. Cold Dyeing
At this point, there is a variety of different ways to finish the dyeing process for the bundles. Steaming is the fastest method, but other techniques include compost dyeing (literally sticking the bundle into a pile of compost and letting it sit for a few weeks) and solar dyeing (letting the sun’s rays help the dyeing process along). However, for my project, I chose the cold dyeing method. This method consists of tying the bundle tightly in a plastic bag (like I did) or leaving it in a sealed glass jar for at least a week. If any mold begins to appear, the bundle can be steamed for 30 minutes or put in the freezer. Then, put everything back into the bag or jar and let the process continue for as long as needed.